This lecture aims at providing a brief review of Version Control Systems, why they are needed, how they work, and the most prominent and popular version control software that are available today for professional collaborative programming.
Some useful links for future reference:
- Linux commands cheat-sheet
- Git reference manual (2009)
- Github’s Git cheat-sheet
- Atlassian’s Git cheat-sheet
- Markdown language cheat-sheet
Lecture Videos
This video is created solely as reference for the attendants of ICP2017F course at UT Austin. If you did not attend this class, then you may not find this video useful.
Motivation
Back in the early years of my graduate studies when I started scientific research and programming, the directory containing my first project looked something like the following figure.

Clearly, there are many disadvantages and caveats with maintaining the structure of your project and codes similar to the content of the above figure:
- Data redundancy and storage inefficiency
Every time you want to develop your existing project and take it to the next level, you have to make a whole duplicate of the last version of your project to start the new development (i.e., the next version of your project). Obviously, your the new version of your project will have a lot in common with the previous version. But, each one has its own dedicated separate folder, there is a lot of code and data redundancy in using such method for just keeping track of your project version history. - High risk of errors and irreversible mistakes
Using this method, it is easy to forget which directory you’re in and accidentally write to the wrong file or copy over files you don’t mean to. - Difficulty in tracking minor developments in the project
Every version of the project is supposed to correspond to one working version of the project, that is, in professional terminology, each stage of the project should correspond to a deliverable. Therefore, if all minor developments of the project are to be documented, then each minor development has to be recorded as a new version of the project, with its own dedicated directory. However, since this is practically impossible, the programmer (researcher) has to either skip documenting all minor improvements, and therefore lose track of every detailed development in the code, or exacerbate the first caveat mentioned above, by generating more and more redundant copies of the same codes and data for the sake of keeping track of all minor stages of the development. - Ambiguity in version differences
With this primitive method of project version control, it is not clear what the main differences between different versions of the project are, unless a very detailed documentation is provided along with each version detailing the differences between the current, its ancestor (i.e., the previous version of the project) and its descendant (i.e., the next version of the project), or parallel independent versions of the project (i.e., the project branches). - Sharing and collaboration difficulties
Since the entire project is locally stored and accessible to one programmer or researcher, any collaborative effort will be extremely difficult, and require manual duplication and syncing of the project with other developers. - Potential risk of complete data loss:
As a result of the local storage of the project on a single computer or storage device, there is always a high risk of losing the entire project due to hardware failure, or other unpredicted events.
Fortunately, several smart powerful solutions and software have been developed, collectively known as Version Control System (VCS) for project management, in particular, since the turn of the millennium.
What is Version Control System (VCS)?
Version control is a system that records changes to a file or set of files over time so that you can recall specific versions later.1 Depending on how the project is maintained and shared with others, VCS are classified into three categories:
- Local VCS
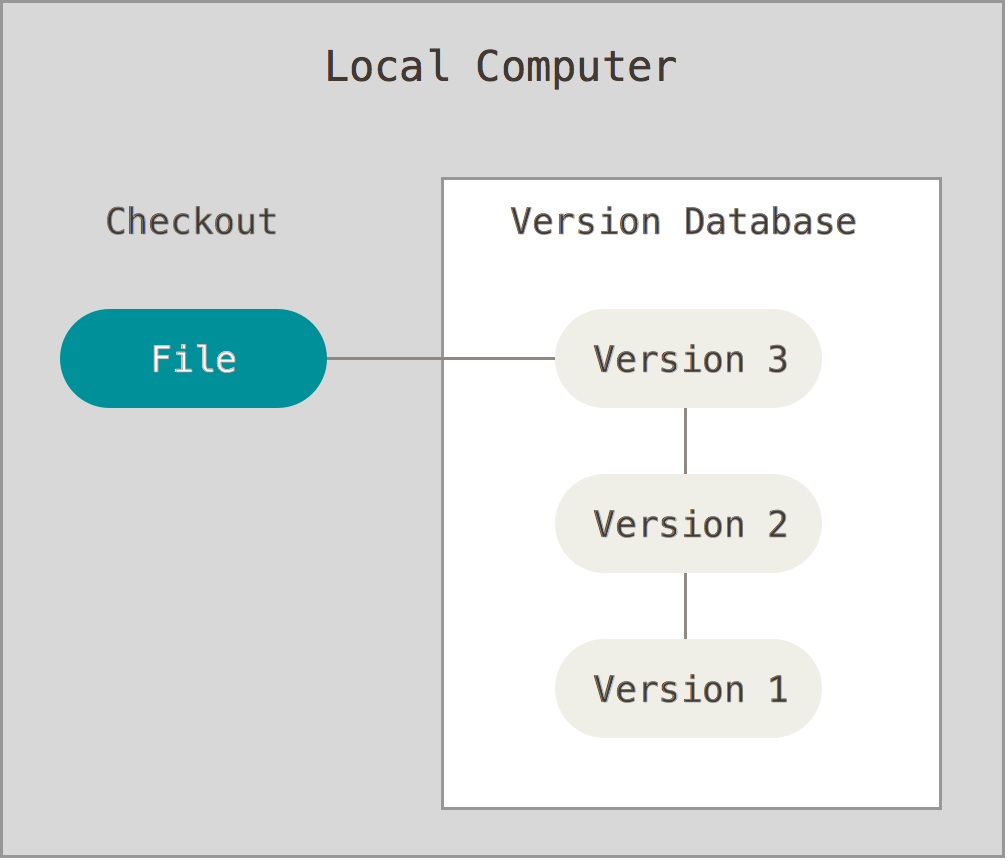
The simplest form of project version control, and probably the oldest method is local VCS where the VCS software keeps track of details of evolution of files in the project only on a local storage device or computer. A prime example of such version control software is the GNU Revision Control System (RCS). Such VCS are able to avoid problems 1-4 mentioned above. The following figure illustrates the inner working of a local VCS.
Major Caveats:- No easy way of collaboration and synchronization between team members.
- Potential risk of complete data loss.
- Centralized VCS (CVCS)
Since collaborative effort is at the heart of almost every large-scale project, a new generation of VCS has been developed that go beyond the capabilities of local VCS. These VCS have a central repository that is accessible by all members of the project’s team. This central repository contains all the project’s information and its development history and clients (team members) can check out and work on individual files of the project. For many years this VCS has been the dominant method version control. Prime examples include Concurrent Versions System (CVS), Perforce Helix and Apache Subversion(SVN). The following figure illustrates the inner working of a CVCS.

Major Caveats:- Since the main database of the project is centralized, and team members have only snapshots of a specific version of the project, any failure in the central database would halt the individual and collaborative works of all team members, since no further developments can be submitted to the central database.
- Also, if the central database is completely corrupted with no backups, then the entire history of the project is lost.
- Distributed VCS (DVCS)
In order to resolve the caveats of the aforementioned VCS, several new VCS known as distributed VCS have been developed within the first decade of the new millennium. With these VCS, each client has an entire copy of the central database at his own local storage device. Thus, every clone of the central repository that is with each client, is a full backup of all the project data. Consequently, if the central server/repository fails for any reason, the local repository of the team member that has the most recent clone of the project database, can be used to restore the central repository. *This VCS paradigm is currently the most popular class of VCS and we will be using a major implementation of it known as Git throughout this course. Other major DVCS implementations include Mercurial, Bazaar, and Darcs. The following figure illustrates the inner working of a DVCS.

A rather complete list of all major VCS software implementations can be found here.
Git/Mercurial version control system
Git is a DVCS that grew out of frustration between the Linux kernel developing community and a proprietary VCS software company that maintained and indexed Linux kernel development. Similar to the other major DVCS implementation Mercurial, Git is designed with the following goals in mind:
- Speed.
- Simple design.
- Strong support for non-linear development (thousands of parallel branches).
- Fully distributed.
- Able to handle large projects like the Linux kernel efficiently (speed and data size).
Git/Mercurial project indexing method
VCS software, such as SVN and and Bazaar, index the new developments in the projects by tracking the changes in individual files of the projects, similar to the diagram below.
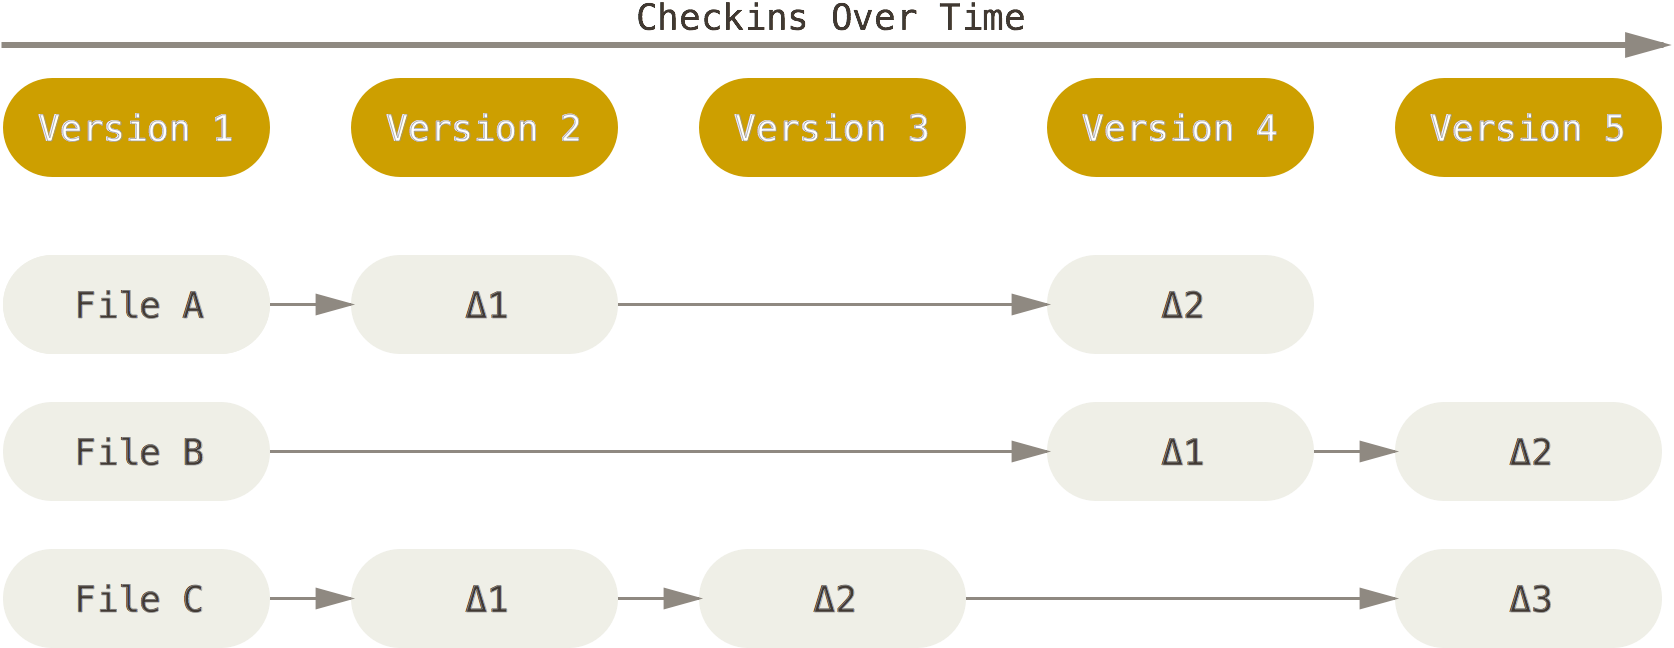
(Diagram is adopted from Git documentation).
By contrast, both Git and Mercurial work by generating a complete snapshot of the project at any moment the project is committed to the local repository for version control. Even if some files have not changed in the new version of the project, they will still exist in the newly generated version of the project. However, both Git and Mercurial have been designed smart enough to realize if any changes has occurred to each individual file and store the files effectively and without redundancy. The complete history of the project is constructed by the series of snapshots generated, a flow similar to the following figure.
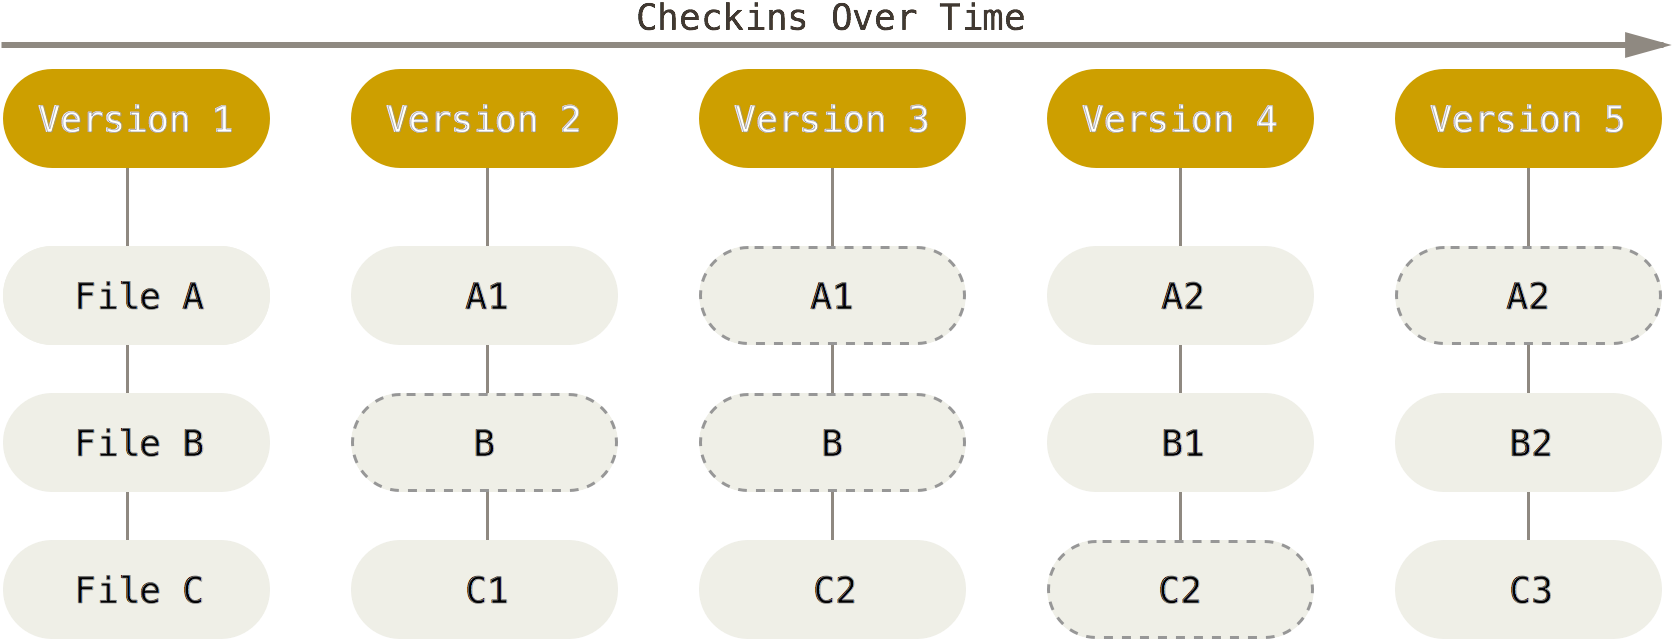
(Diagram is adopted from Git documentation).
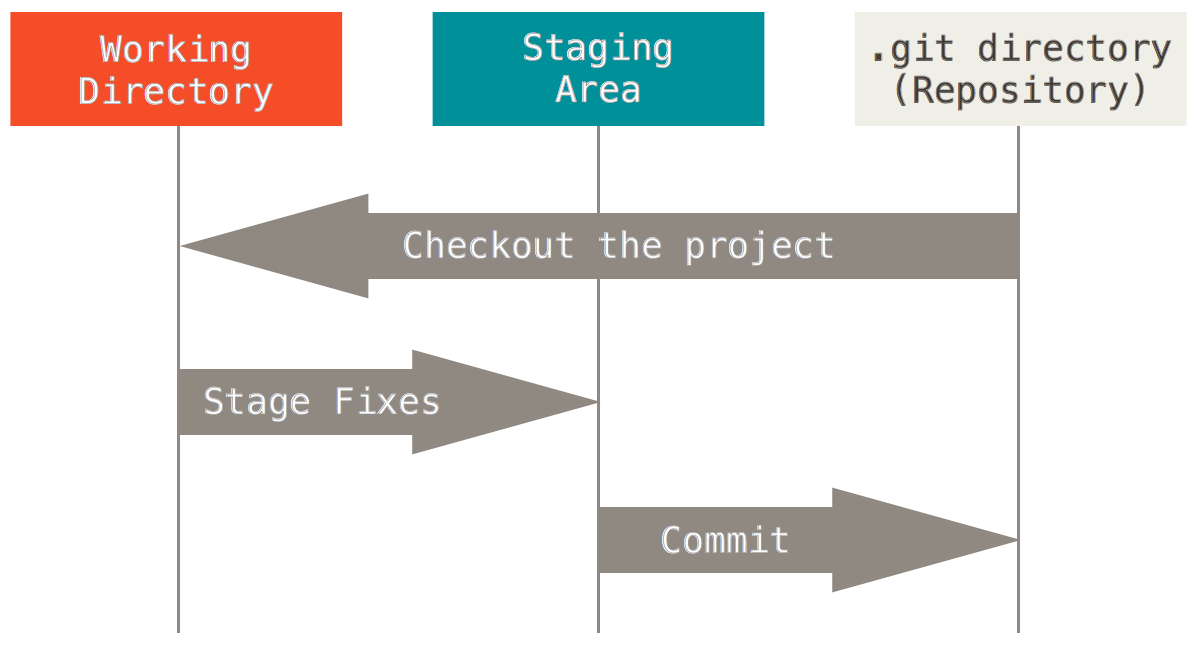
Each project file in Git/Mercurial indexing process can have one of the three possible states:
- modified, but not staged:
This is when a project file is modified by the user, but Git/Mercurial has no track of the file changes at the moment. If the file is lost or removed unexpectedly, then Git cannot recover the file.
- staged for commit to the repository:
When a file is modified it can be added to the Git staging area to be later committed permanently to the repository. The staging area is a file, generally contained in the project’s repository (
.gitdirectory), that stores information about what will go into the next commit to the repository. The staging area is also sometimes referred to as the index. - committed to the repository: Once the staged files are committed to the repository, they become a permanent part of it, and can be later extracted (checked out) for review or further development.
These three file states comprise an important integral part of Git and Mercurial. The following figure provides an illustration of the three file states.
Remote repository options for your Git/Mercurial projects
Git can be downloaded and installed from here for Windows, Mac, or Linux systems. The installation guide is available here. Mercurial can be downloaded and installed from here for Windows, Mac, or other operating systems. For collaborative projects, you will need a central (remote) project repository to which all team members submit their latest developments. Even if you are working on a project alone, it is always a good idea to submit all your project developments to a remote repository for the sake of avoiding unpredicted data loss and also publicly showcasing your work. Two popular online repositories for version-controlled projects are:
- Github, which is also an Internet hosting service works and works exclusively for projects that are indexed using Git. As of today, all public projects (visible to everyone on the web) are free-of-charge. For private projects you will have to pay a monthly fee. However, Github Student offers a micro-account specially for students with five private repositories free-of-charge (normally $7/month) while you’re a student.
- Bitbucket, which used to exclusively host Mercurial-indexed projects, but as of 2011 can also host Git-indexed projects. As of today, all projects, public or private (up to 5 users), can be stored on Bitbucket free-of-charge.
The following is a concise comparison between the general features and services of Github and Bitbucket.
| Feature | Bitbucket | Github |
| Supported VCS | Mercurial, Git | Git |
| Public repos | Free, unlimited | Free, unlimited |
| Private repos | Free up to 5 users | Starts at $7/month for unlimited users |
| Popular projects hosted | Adium, Mailchimp, Opera, Python, Django | Bootstrap, Node.js, jQuery, Rails, Homebrew |
| Notable Extra features | External authentication via Github, Twitter, Facebook, Google | Two-factor authentication, Github Pages, Github Gists |
Setting up your first Git project on Github
For this course, we will use Git as our version control software, and Github as central (remote) repository. Follow the following guidelines to create your first Git project on Github.
- Go to Github Student and create your student account.
- Download and install Git on your computer.
Setting up your Git identity
The first thing you should do when you install Git is to set your user-name and email address. This is important because every Git commit uses this information, and this information is permanently baked into the commits you start making to your projects’ repositories. To set your name and email globally for all Git projects once and for all on your computer, use the following Git commands:
$ git config --global user.name "<your name, e.g., Amir Shahmoradi>"
$ git config --global user.email <your email, e.g., amir@ices.utexas.edu>
You need to do this only once if you pass the --global option, because then Git will always use the provided information for anything you do with Git on your system. If you want to override this information with a different name or email address later on for some specific projects, you can run the above same Git commands, but without the --global optional flag when you are in your specific project’s directory.
Two methods of project initialization
Now at this point, there are two ways for project initialization. We will go through both here. A good detailed tutorial can be found here.
1. Remote project initialization (on Github)
With this method you first initialize an empty project on Github, and then clone the project from the remote (Github) repository to your local device, using the git clone command, discussed later below. To create a remote repository on Github, login to your Github account and follow the instructions on this page.
2. Local project initialization
Local project initialization is done by the following git command:
$ git init
This command will initialize an empty repository in the current directory. If you check the repository, you will notice that a .git (hidden) folder has been added to the directory. This folder will contain all history of your new project, and anything in the current directory in which .git folder exists will be indexed as part of the project.
In order to generate the project’s repository in different directory, use
$ git init <directory name>
Even if the requested directory does not exist, git will first automatically create the requested directory and initialize the empty project inside it. That’s it! Now all you need to do is to start adding or developing your project files inside the project folder.
Local device and remote repository SSH connection
Why is SSH needed?
Now every time may you want to clone your remote private repository to your local device or push your local repository to a remote server (your Github account), or basically do any communication between the local and remote repositories, Git will ask you to authenticate your connection by supplying your Github username and password. Note that this security behavior is necessary, since you don’t want just anyone to be able to push to your personal projects or mess with them without your prior permission.
However, this rather annoying user/pass request by Git can be resolved by setting up an SSH secure connection between your local device and the remote repository.
How does it work?
Think of your local device as a person who has a set of keys, now if your remote repository is a home with an entrance key hole that matches one of the person’s (local device’s) keys, then the person (your device) can gain access to the interior of the home (your remote repository).
How is it set up?
You can generate keys for your local device by following the instructions given here. Once you have generated the key and the key hole, you can add a copy of the key hole to your Github account by following the instructions given here.
Here is an example educational video, explaining the SSH key setup process:
Main Git commands
As of today, Git has more than 150 commands. For a complete list, you can type on your Git bash command window,
$ git help -a
to see a list of all Git commands. Note that every Git command begins with git. Despite the long list of Git commands, you will likely use only five of them on an everyday basis. Not that the rest are unimportant, but with these five basic commands you will be at least able to develop and index your project, and communicate with remote repository and colleagues. In order to understand these five, we will have to recall the three states of a project’s files, described earlier above.
1. Check the status of the project
First of all, you can check the status of your git project at any time by typing the following command in the git-bash prompt window, assuming the command line is already on the project’s directory.
$ git status
2. Add files to the staging area
In order to add any of the modified or new files to the staging area, use
$ git add <file name>
To add all modified files (including file removals as well as changes) to the staging area, use
$ git add -A
or,
$ git add --all
This command is equivalent to
$ git add .
$ git add -u
The first command stages new and modified files, but not the deleted files. The second command, stages modified and deleted files, without the newly created files.
The full documentation for git add can be found here.
3. Commit the staged files to the local repository
The stages files can be committed (i.e., submitted permanently) to the local repository by
$ git commit
once this command is entered, a new page for log message will open on the command line, which contains the list of all files to be committed, and a place at the top of the page to add comments regarding this version of the files that is being committed to the repository. To add a comment, press i to enter the insert mode of the vim text-editor. Once comment is added, press ESC button to exit the insert mode, and write :wq on the command-line to write the comment file (i.e., save it) and quit vim text-editor.
If you use,
$ git commit -a
or,
$ git commit -all
Both commands act as a shortcut to first automatically stage files that have been modified and deleted and then commit them to the repository, but not the new files that you have not yet told Git about. Another useful flag is -m with which you can enter a short message on the command line as the log message of the commit, and therefore no new page will open up for entering log message,
$ git commit -m "This is a test commit!"
The -a and -m flags can be combined to automatically stage and commit the files together,
$ git commit -am "This is a test commit!"
But, keep in mind that with this method of staging, the new files will neither be staged nor committed to the repository.
The full documentation for git commit can be found here.
4. Push the changes in local repository to the remote repository
Now, in order to push all your commits from the local repository to the remote repository, in order to place permanently there and be able to share it with others, use
$ git push --all
We have not yet talked about git branches, but what the above command basically does is that it orders Git to push all project branches to the remote repository. Later on, we will talk more about different flags that can follow git push command.
The full documentation for git push can be found here.
5. Pull the latest project revision from the remote to the local repository
Now, in order to pull the latest revision of the project – a result of other people’s work that is not available in your local repository – from the remote to the your local repository, use
$ git pull
There are some important details about git pull which we will delve into later on in the following lectures.
The full documentation for git push can be found here.
Git commands summary
All in all, the most trivial, but also the most useful git commands are the following:
$ git status
$ git add --all
$ git commit
$ git push --all
for submitting your changes to the local and remote repositories, and
$ git pull
for syncing your local with the remote repository. Remember that you have to use these commands, in the above forms, inside the directory of the project.
Footnotes
-
For a thorough review of VCS and particularly Git, see the Git documentation. ↩