This lecture aims at providing a brief review of some advanced topics in Git Version Control System which are essential for effective management of large collaborative projects.
A useful Git-cheatsheet link for future reference: Advanced Git cheatsheet
Lecture Videos
This video is created solely as reference for the attendants of ICP2017F course at UT Austin. If you did not attend this class, then you may not find this video useful.
Getting help for Git commands
There are basically three ways to request information about Git commands on the Git-bash command line:
$ git help <command name>
$ git <command name> --help
$ man git-<command name>
Note that the last command man is not a Git command. All Git commands begin with the word git.
Viewing the Git commit history
You can check the history of project commits to the repository using the Git command git log.
For example, here is a snippet from the output of git log on laptop screen:
  $ git log
commit 264043e0d49006b7f59e57639961c333b5d5f124
Author: Amir Shahmoradi <a.shahmoradi@gmail.com>
Date:   Tue Jan 24 17:48:33 2017 -0600

    data tables for 1D model added.

commit b45ddd780c18736bac42ff27aade301a6b0f09cb
Author: Amir Shahmoradi <a.shahmoradi@gmail.com>
Date:   Tue Jan 24 10:08:53 2017 -0600

    minor edit

commit b6f4fb69d97a396bde7159c78424100704328634
Author: Amir Shahmoradi <a.shahmoradi@gmail.com>
Date:   Thu Jan 12 21:03:28 2017 -0600

    *.txt files removed

commit 961ff2d4ac68081a21864b2f1b067b43424d3342
Author: Amir Shahmoradi <a.shahmoradi@gmail.com>
Date:   Thu Jan 12 21:02:00 2017 -0600

    update

commit 8fd3c49e90d96f4bcef2302c7b227f06ad7a5250
Author: Amir Shahmoradi <a.shahmoradi@gmail.com>
Date:   Thu Jan 12 19:36:45 2017 -0600

    minor

commit cd0ed7def385ba29ea134bcc18a4ad0873d9f5ee
Author: Amir Shahmoradi <a.shahmoradi@gmail.com>
Date:   Thu Jan 12 19:32:51 2017 -0600

    minor

commit 8096668868ef64189f788669d5f1838cd944f9b6
Author: Amir Shahmoradi <a.shahmoradi@gmail.com>
Date:   Thu Jan 12 19:28:22 2017 -0600

    minor

commit c52ba6adea474625cce1493896ecaac40cb976af
Author: Amir Shahmoradi <a.shahmoradi@gmail.com>
Date:   Thu Jan 12 19:24:23 2017 -0600

    minor

commit ab5a17f9e913e55cae0f971fd9b485a0a6e8dec3
Author: Amir Shahmoradi <a.shahmoradi@gmail.com>
Date:   Thu Jan 12 19:16:27 2017 -0600

    minor

commit ce5c2421db6e76a338a0e6922acead9100a7c4c4
Author: Amir Shahmoradi <a.shahmoradi@gmail.com>
Date:   Thu Jan 12 19:10:19 2017 -0600

    minor

commit 4a7d27d81260c2e2a29b6259e6c97befc065c069
Author: Amir Shahmoradi <a.shahmoradi@gmail.com>
Date:   Thu Jan 12 19:05:14 2017 -0600

:
There is a long list of options that can be used with git log command to display exactly what you need on bash screen.
Some of the most useful are discussed below.
To lists the differences of the files between different commits use -p flag:
$ git log -p
To lists only a limited number of most recent commits use -<number of commits to display> flag. For example:
$ git log -2
$ git log -2
commit 264043e0d49006b7f59e57639961c333b5d5f124
Author: Amir Shahmoradi <a.shahmoradi@gmail.com>
Date:   Tue Jan 24 17:48:33 2017 -0600

    data tables for 1D model added.

commit b45ddd780c18736bac42ff27aade301a6b0f09cb
Author: Amir Shahmoradi <a.shahmoradi@gmail.com>
Date:   Tue Jan 24 10:08:53 2017 -0600

    minor edit
To list the statistics of the commits, use,
$ git log --stat -1
commit 264043e0d49006b7f59e57639961c333b5d5f124
Author: Amir Shahmoradi <a.shahmoradi@gmail.com>
Date:   Tue Jan 24 17:48:33 2017 -0600

    data tables for 1D model added.

 README.md                |   1 +
 results/tables/README.md |   8 ++-
 results/tables/tgm.mat   | Bin 0 -> 2550889 bytes
 src/defineProject.m      |   3 +-
 src/main.m               |  82 +++++++++------------------
 src/writeTables.m        |  75 ++++++++++++++++++++++++
 9 files changed, 140 insertions(+), 56 deletions(-)
The log data can be even represented formatted via the flag --pretty=format:"<the desired format>". For example,
$ git log -3 --pretty=format:"%h - %an, %ar : %s"
264043e - Amir Shahmoradi, 7 days ago : data tables for 1D model added.
b45ddd7 - Amir Shahmoradi, 7 days ago : minor edit
b6f4fb6 - Amir Shahmoradi, 3 weeks ago : *.txt files removed
A list of available format options is provided below.
| Option | Description of Output |
|---|---|
%H |
Commit hash |
%h |
Abbreviated commit hash |
%T |
Tree hash |
%t |
Abbreviated tree hash |
%P |
Parent hashes |
%p |
Abbreviated parent hashes |
%an |
Author name |
%ae |
Author email |
%ad |
Author date (format respects the --date=option) |
%ar |
Author date, relative |
%cn |
Committer name |
%ce |
Committer email |
%cd |
Committer date |
%cr |
Committer date, relative |
%s |
Subject |
A list of useful options for git log is given in the table below.
| Option | Description |
|---|---|
-p |
Show the patch introduced with each commit. |
--stat |
Show statistics for files modified in each commit. |
--shortstat |
Display only the changed/insertions/deletions line from the --stat command. |
--name-only |
Show the list of files modified after the commit information. |
--name-status |
Show the list of files affected with added/modified/deleted information as well. |
--abbrev-commit |
Show only the first few characters of the SHA-1 checksum instead of all 40. |
--relative-date |
Display the date in a relative format (for example, “2 weeks ago”) instead of using the full date format. |
--graph |
Display an ASCII graph of the branch and merge history beside the log output. |
--pretty |
Show commits in an alternate format. Options include oneline, short, full, fuller, and format (where you specify your own format). |
A list of useful options for git log commands that can change the format of the output, is given in the table below.
| Option | Description |
|---|---|
-<n> |
Show only the last n commits (e.g., -2, -3, ...). |
--since, --after |
Limit the commits to those made after the specified date. |
--until, --before |
Limit the commits to those made before the specified date. |
--author |
Only show commits in which the author entry matches the specified string. |
--committer |
Only show commits in which the committer entry matches the specified string. |
--grep |
Only show commits with a commit message containing the string. |
-S |
Only show commits adding or removing code matching the string. |
For example, to list the commit history since a specific time in the past, use --since flag:
$ git log --since=2.weeks
commit 264043e0d49006b7f59e57639961c333b5d5f124
Author: Amir Shahmoradi <a.shahmoradi@gmail.com>
Date:   Tue Jan 24 17:48:33 2017 -0600

    data tables for 1D model added.

commit b45ddd780c18736bac42ff27aade301a6b0f09cb
Author: Amir Shahmoradi <a.shahmoradi@gmail.com>
Date:   Tue Jan 24 10:08:53 2017 -0600

    minor edit
or, with the following date format:
$ git log --since="2017-01-15"
Undoing, amending, and tagging
Suppose you want to undo the latest addition of files to the stage area. The command to use in order to clean the stage area is,
$ git reset
This command is basically the opposite of git add. There are a lot of options that can accompany this Git command, details of which can be found in Git documentation.
However, be careful when using this command, especially with flag --hard, which can result in changes in your working directory as well, thus leading to involuntary loss of latest uncommitted files.
Another useful command is,
$ git commit --amend
which is used when you forget to add some files to your latest commit and now, you would like to add the latest content of your project’s staging area to the last commit, by amending it.
The Git command git tag allows you to tag specific important commits in your commit history, for example a final release of your project/software. If you just type git tag on Git bash command line, it will list all tags in the project, in alphabetical order,
$ git tag
v1.0
v1.1
v2.0
You can create a tag for the latest commit to your repository by using,
git tag -a v3.0 -m "new version of project"
This will add a new tag pointing to the latest commit in the project with name v3.0 and the message new version of project.
Now if you want to display the information about a specific tag, use git show,
$ git show v1.0
tag v1.0
Tagger: Amir Shahmoradi <a.shahmoradi@gmail.com>
Date:   Tue Jan 1 18:08:00 2017 -0600

first tag

commit 25129a074aece69d234838764e7df63ed1fb3023
Author: Amir Shahmoradi <a.shahmoradi@gmail.com>
Date:   Fri Dec 27 17:12:08 2016 -0600

    Update README.md
You can also create a lightweight tag by avoiding -a, -s, or -m flags in you tag command,
git tag v4.0
Annotated tags (created with -a flag) are meant for very important project versions, such as a software release, while lightweight tags are meant for private or temporary object labels.
For more information about git tag, see Git documentation.
Working with remote Repositories
In order to see which remote servers you have configured for your project, you can run the following Git command,
$ git remote
origin
In the output above, origin is the default name that Git gives to the server you cloned your project from. If you also specify -v flag, Git will show you the URLs that Git has stored for the remote shortname (e.g., origin) to be used when reading and writing to that remote repository.
$ git remote -v
origin  git@github.com:shahmoradi/foo.git (fetch)
origin  git@github.com:shahmoradi/foo.git (push)
In order to see more information about a particular remote repository in your project, you can use,
$ git remote show origin
* remote origin
  Fetch URL: git@github.com:shahmoradi/foo.git
  Push  URL: git@github.com:shahmoradi/foo.git
  HEAD branch: master
  Remote branches:
    development tracked
    master      tracked
  Local branch configured for 'git pull':
    master merges with remote master
  Local ref configured for 'git push':
    master pushes to master (up to date)
The above information indicates that the current HEAD branch of the project is on master branch, and the remote branches on the remote repository are master and development.
You can find more information about git remote command in Git documentation.
Git branching
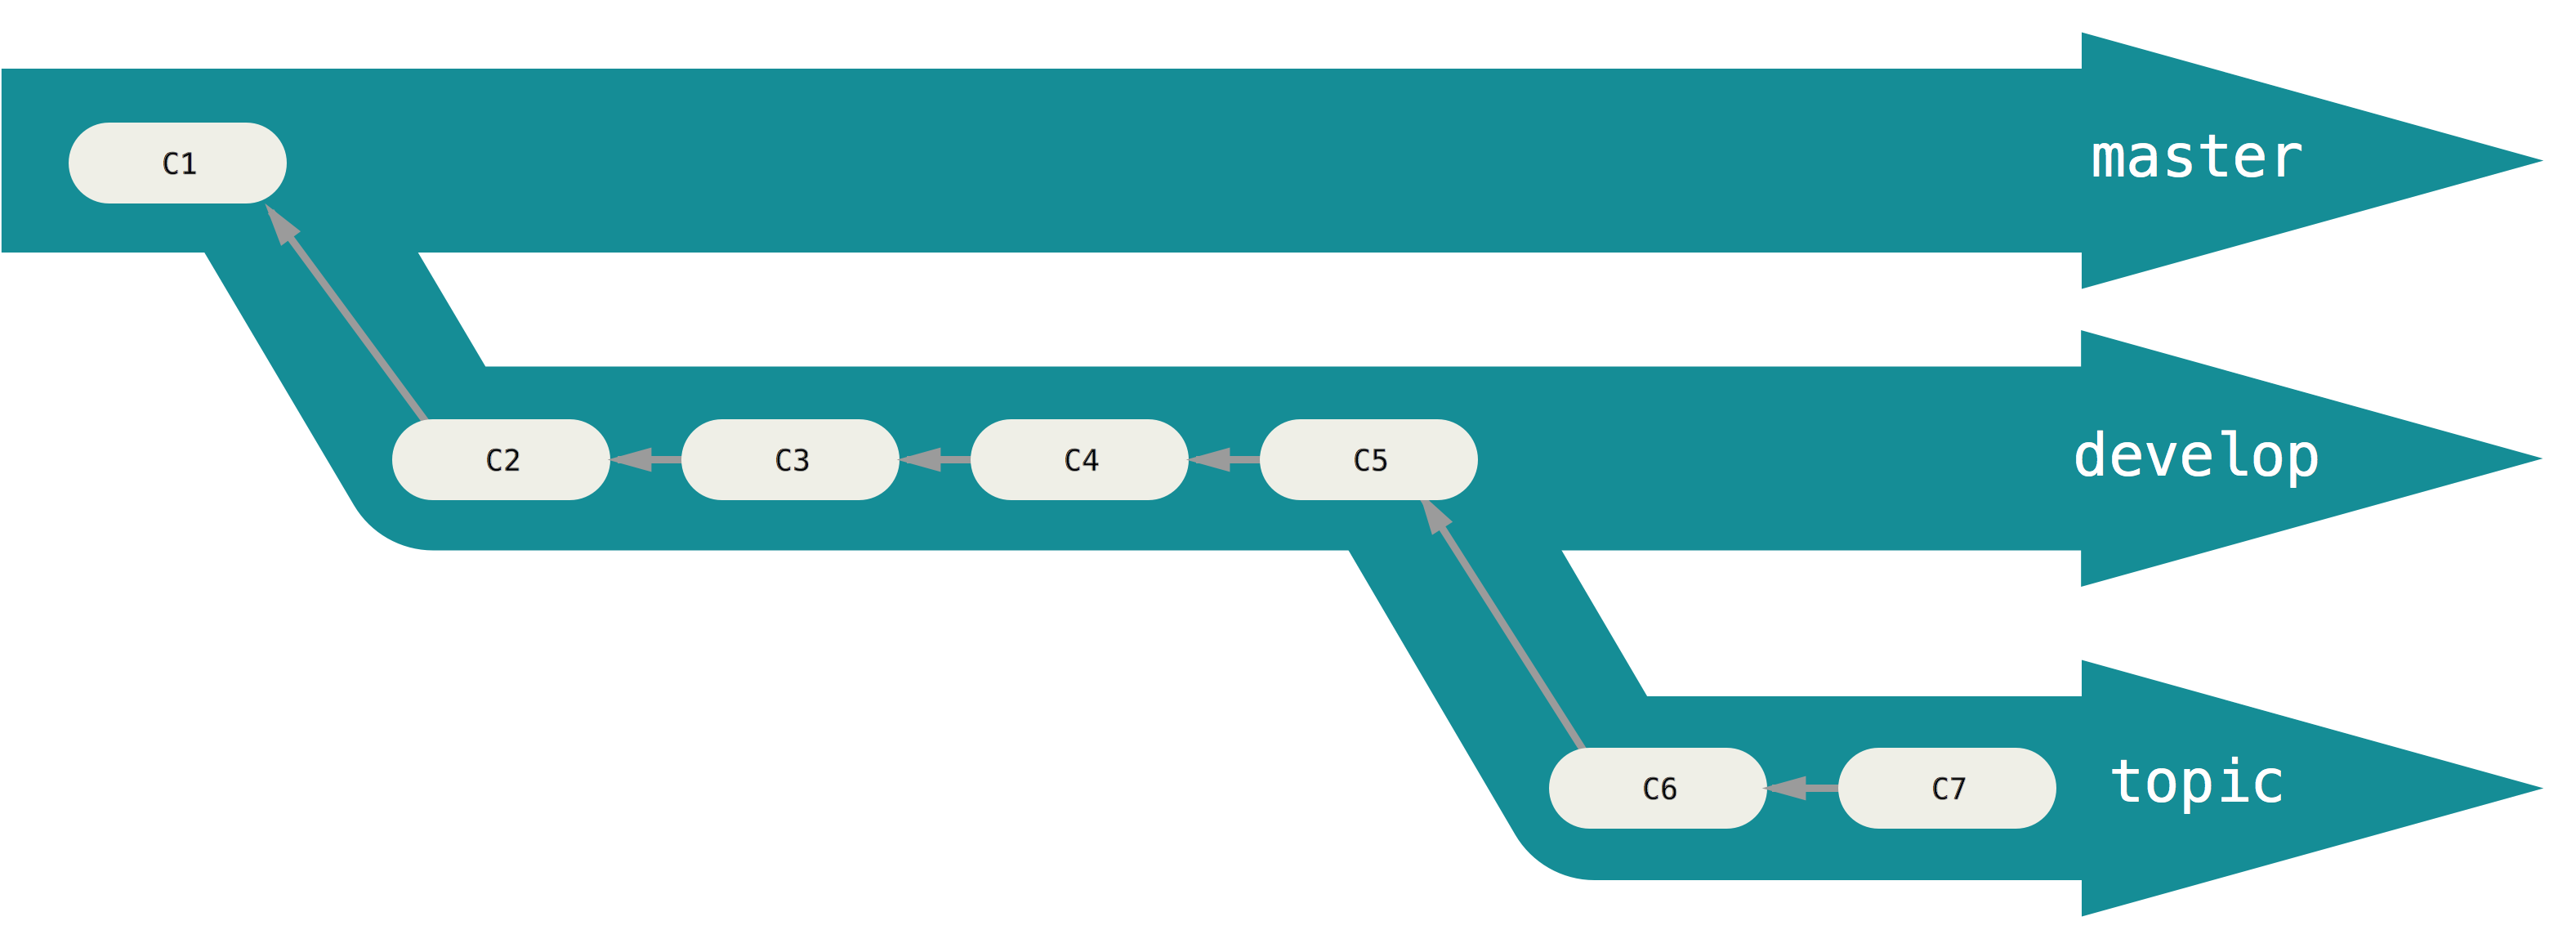
Branching is powerful idea in Version Control Systems, which significantly facilitates collaboration or parallel development of a project. Suppose you have already a project which has reached its first release version, meaning that it works all fine. Now, you like to add a new feature to your project. To do this and to avoid further commits to your original project, you can create a new branch of the project which is specifically devoted to adding the new feature. See the following figure, for an example of Git branching.
When you create a Git project, the default single branch in your project is master. So, for example if you search for your project branches, you’d see,
$ git branch
* master
If you already have created other branches in your project, for example development, then you may see a Git message like the following,
$ git branch
* development
  master
The * behind the branch name indicates that the project HEAD (i.e., your working directory) points to that branch, that is, all commits will be made to that branch that is highlighted with *. In the example above, the working directory points to development branch.
In order to create a new branch in your project, use,
$ git branch <branch name>
For example,
$ git branch development
When you create a new branch, Git creates an exact duplicate of the current branch that you are in, but with the requested name for the new branch. In order to switch to a specific Git branch in your project, use,
$ git checkout <branch name>
For example,
$ git checkout development
Switched to branch 'development'
A shortcut for both creating a new branch from the current branch, and switching to the new branch automatically is to use,
$ git checkout -b <branch name>
$ git checkout -b test
Switched to a new branch 'test'
Now suppose, you have made some significant progress on your project development branch, and now you want to add the newly developed feature to your master branch. All you need to do, is,
$ git checkout master
$ git merge development
By doing this, you first switch to master branch, then request Git, to merge all changes made to the project on the development branch to be copied and transferred to the master branch. For example, if I have added a single test.txt file, and committed the change to the development branch, then upon mergin with master, Git will display something like the following,
$ git merge development
Updating 25129a0..57ed7c2
Fast-forward
 test.txt | 2 ++
 1 file changed, 2 insertions(+)
 create mode 100644 test.txt
Now suppose there was no change in the development branch, since branching it from master. Then upon merging, you would get a message like the following,
$ git merge development
Already up-to-date.
Occasionally, conflicts may arise between branches upon merging. This happens when a common file between the two branches, has been modified on both branches in parallel. In such cases, you will need to resolve the conflict by choosing one of the file edits in one of the branches and discard the other. The following is an example merge conflict message by Git.
$ git merge development
Auto-merging test.txt
CONFLICT (content): Merge conflict in test.txt
Automatic merge failed; fix conflicts and then commit the result.
For example, if you use git status command, the following is the typical message that will be displayed,
$ git status
On branch test
You have unmerged paths.
  (fix conflicts and run "git commit")
  (use "git merge --abort" to abort the merge)

Unmerged paths:
  (use "git add <file>..." to mark resolution)

        both modified:   test.txt

no changes added to commit (use "git add" and/or "git commit -a")
To resolve the conflict, open the conflicting file. There you will see the segments of the file from both versions which are the cause of the conflict. Edit the file as you wish. and then perform the normal git add and git commit on the file, to resolve the conflict and complete the merge process.
In addition to git merge, there is another more elegant and powerful Git command, git rebase for integrating changes in different branches into a single branch. But, the subject goes beyond the goals of this class, and the interested reader is referred to Git documentation for this command and this pedagogical Git page for git rebase.
Deleting a branch
Normally, when a branch merge is done, the development branch is not needed anymore, so it is always wise and cleaner to delete the unwanted branches, using the command git branch -d <branch name>. To do this, on the same branch that you just performed git merge use,
$ git checkout master
Your branch is ahead of 'origin/master' by 1 commit.
  (use "git push" to publish your local commits)
Switched to branch 'master'
$ git branch -d test
Deleted branch hotfix (3a0874c).
Note that you cannot delete a branch while you are on it (i.e., while it is checked out). For example, Git will give you the following error message,
$ git branch -d test
error: Cannot delete branch 'test' checked out at 'C:/Users/Amir/git/foo'
You cannot delete a branch from another branch with which you have not performed the merging either. In this case, Git will give the following error,
$ git branch -d test
error: The branch 'test' is not fully merged.
If you are sure you want to delete it, run 'git branch -D test'.
Advice for good project management
Your master branch should always contain the latest clean version of your project, that is, the complete and working version/release. You should always make your new developments in a separate branch, and once it works and the new feature/development is complete, you merge the new development into the master branch.
Footnotes
1. See Git documentation for more details and updates. ↩