Useful links for future reference
- Linux commands cheat-sheet
- Git reference manual (2009)
- GitHub’s Git cheat-sheet
- Atlassian’s Git cheat-sheet
- Markdown language cheat-sheet
- Advanced Git cheatsheet
Motivation
When I started scientific research and programming in the early years of my graduate studies, the directory containing my first project looked something like the following figure.
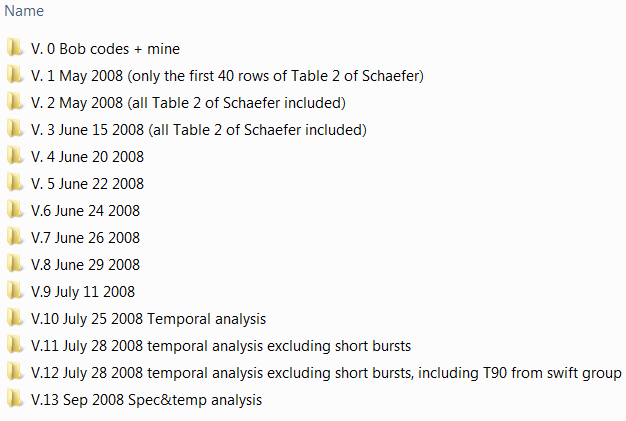
Clearly, there are many disadvantages and caveats with maintaining the structure of your project and codes similar to the content of the above figure:
- Data redundancy and storage inefficiency
Every time you want to develop your existing project and take it to the next level, you have to make a complete copy of the last version of your project to start the new development (i.e., the next version of your project). Obviously, the new version of your project will have a lot in common with the previous version. But, each one has its dedicated separate folder. So, there is a lot of code and data redundancy in using such an approach to keeping track of your project’s version history. - High risk of errors and irreversible mistakes
It is easy to forget which directory you are in using this method and to write to the wrong file accidentally or to overwrite files you did not mean to mistakenly. - Difficulty in tracking minor developments in the project
In professional programming, all minor developments and changes to a project must be tracked and well-documented (only the major versions of the project (called deliverable in programming terminology) are supposed to be available to non-developers or customers. Therefore, one has to create a new complete copy of the project with its dedicated directory to keep track of every minor stage of the program development. However, since this is practically impossible, the programmer or the researcher has to either skip documenting all minor improvements and, therefore, lose track of detailed changes in the code or otherwise worsen the first caveat mentioned above by generating more and more redundant copies of the same codes and data for the sake of keeping track of all minor stages of the development. - Ambiguity in version differences
With this primitive method of project version control, it is not clear what the main differences between different versions of the project are unless very detailed documentation is provided along with each version detailing the differences between the current, its ancestor (i.e., the previous version of the project) and its descendant (i.e., the next version of the project), or parallel independent versions of the project (i.e., the project branches). - Sharing and collaboration difficulties
Since the entire project is locally stored and accessible to one programmer or researcher, any collaborative effort will be extremely difficult, and require manual duplication and syncing of the project with other developers. - Potential risk of complete data loss:
Since the project is stored locally, on a single computer or storage device, there is always a high risk of losing the entire project due to hardware failure or other unpredicted events.
Fortunately, several smart, powerful solutions and software have been developed, collectively known as Version Control System (VCS) for project management, in particular, since the dawn of the new millennium.
What is Version Control System (VCS)?
Version control is a system (e.g., software) that records changes to a file or set of files over time so that you can recall specific versions later.1 Depending on how the project is maintained and shared with others, VCS is classified into three categories:
- Local VCS
The simplest form of project version control, and probably the oldest method, is local VCS where the VCS software keeps detailed track of the evolution of individual files in the project only on a local storage device or computer. A prime example of such version control software is the GNU Revision Control System (RCS). Such VCS is able to avoid problems 1-4 mentioned above. The following figure illustrates the inner workings of a local VCS.
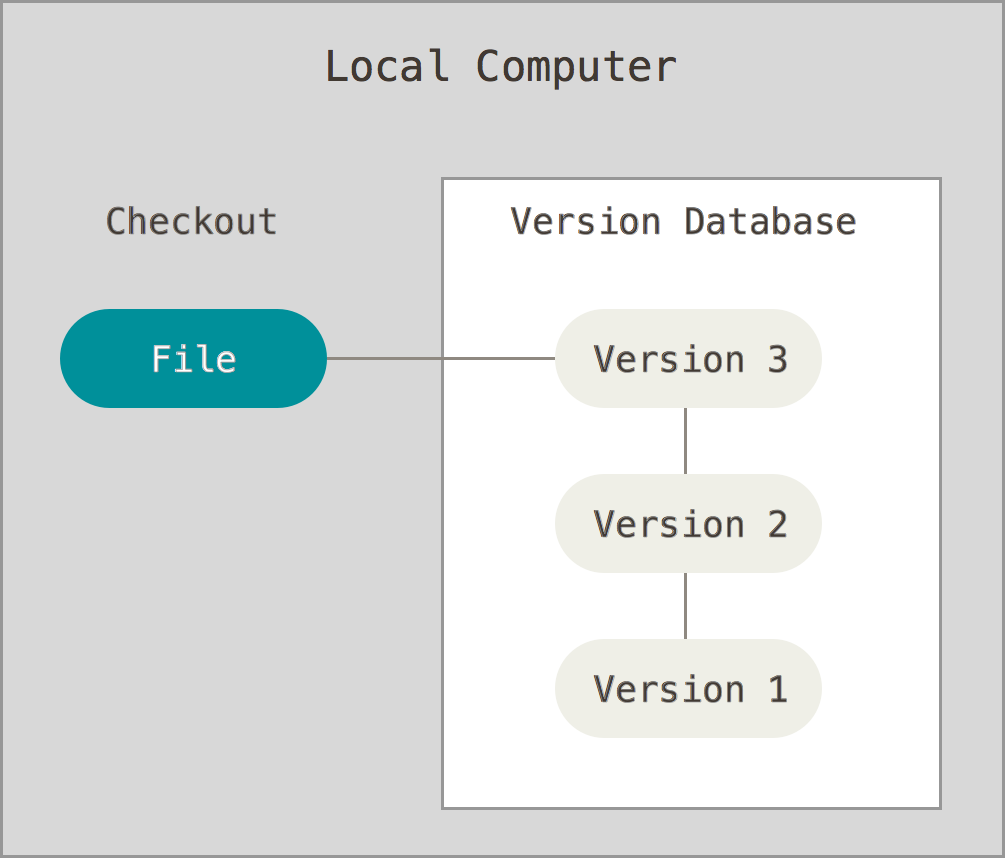
Major Caveats:- There is no easy way for collaboration and synchronization between team members.
- There is a potential risk of complete data loss.
- Centralized VCS (CVCS)
Since collaborative effort is at the heart of almost every large-scale project, a new generation of VCS has been developed that go beyond the capabilities of local VCS. These VCSs have a central repository that is accessible to all members of the project’s team. This central repository contains all of the project’s information, and its development history, and clients (team members) can check out and work on individual files of the project. For many years this style of VCS used to be the dominant method of software version control. Prime examples include Concurrent Versions System (CVS), Perforce Helix and Apache Subversion(SVN). The following figure illustrates the inner workings of a CVCS.
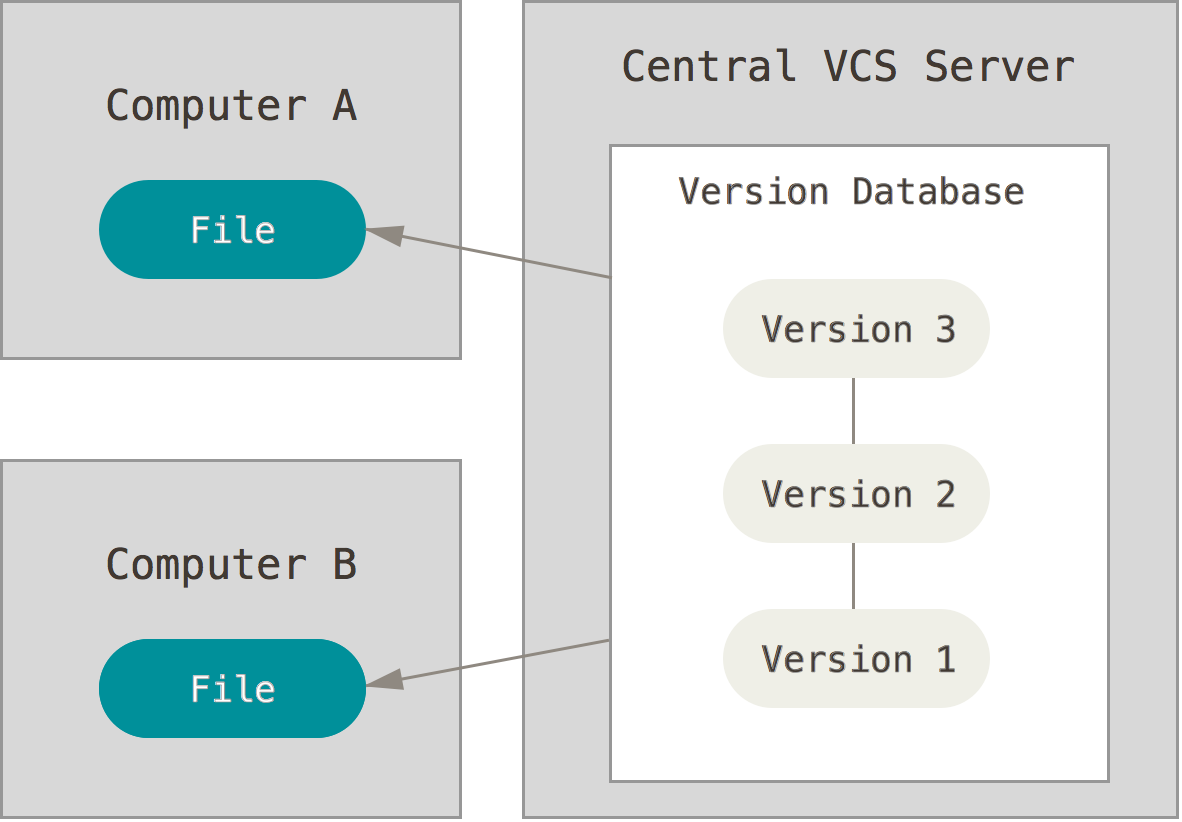
Major Caveats:- Since the central database of the project is centralized, and team members have only snapshots of a specific version of the project, any failure in the central database would halt the individual and the collaborative works of all team members as no one can submit further developments to the central database.
- Also, if the central database fails with no backups, then the entire history of the project is lost.
- Distributed VCS (DVCS)
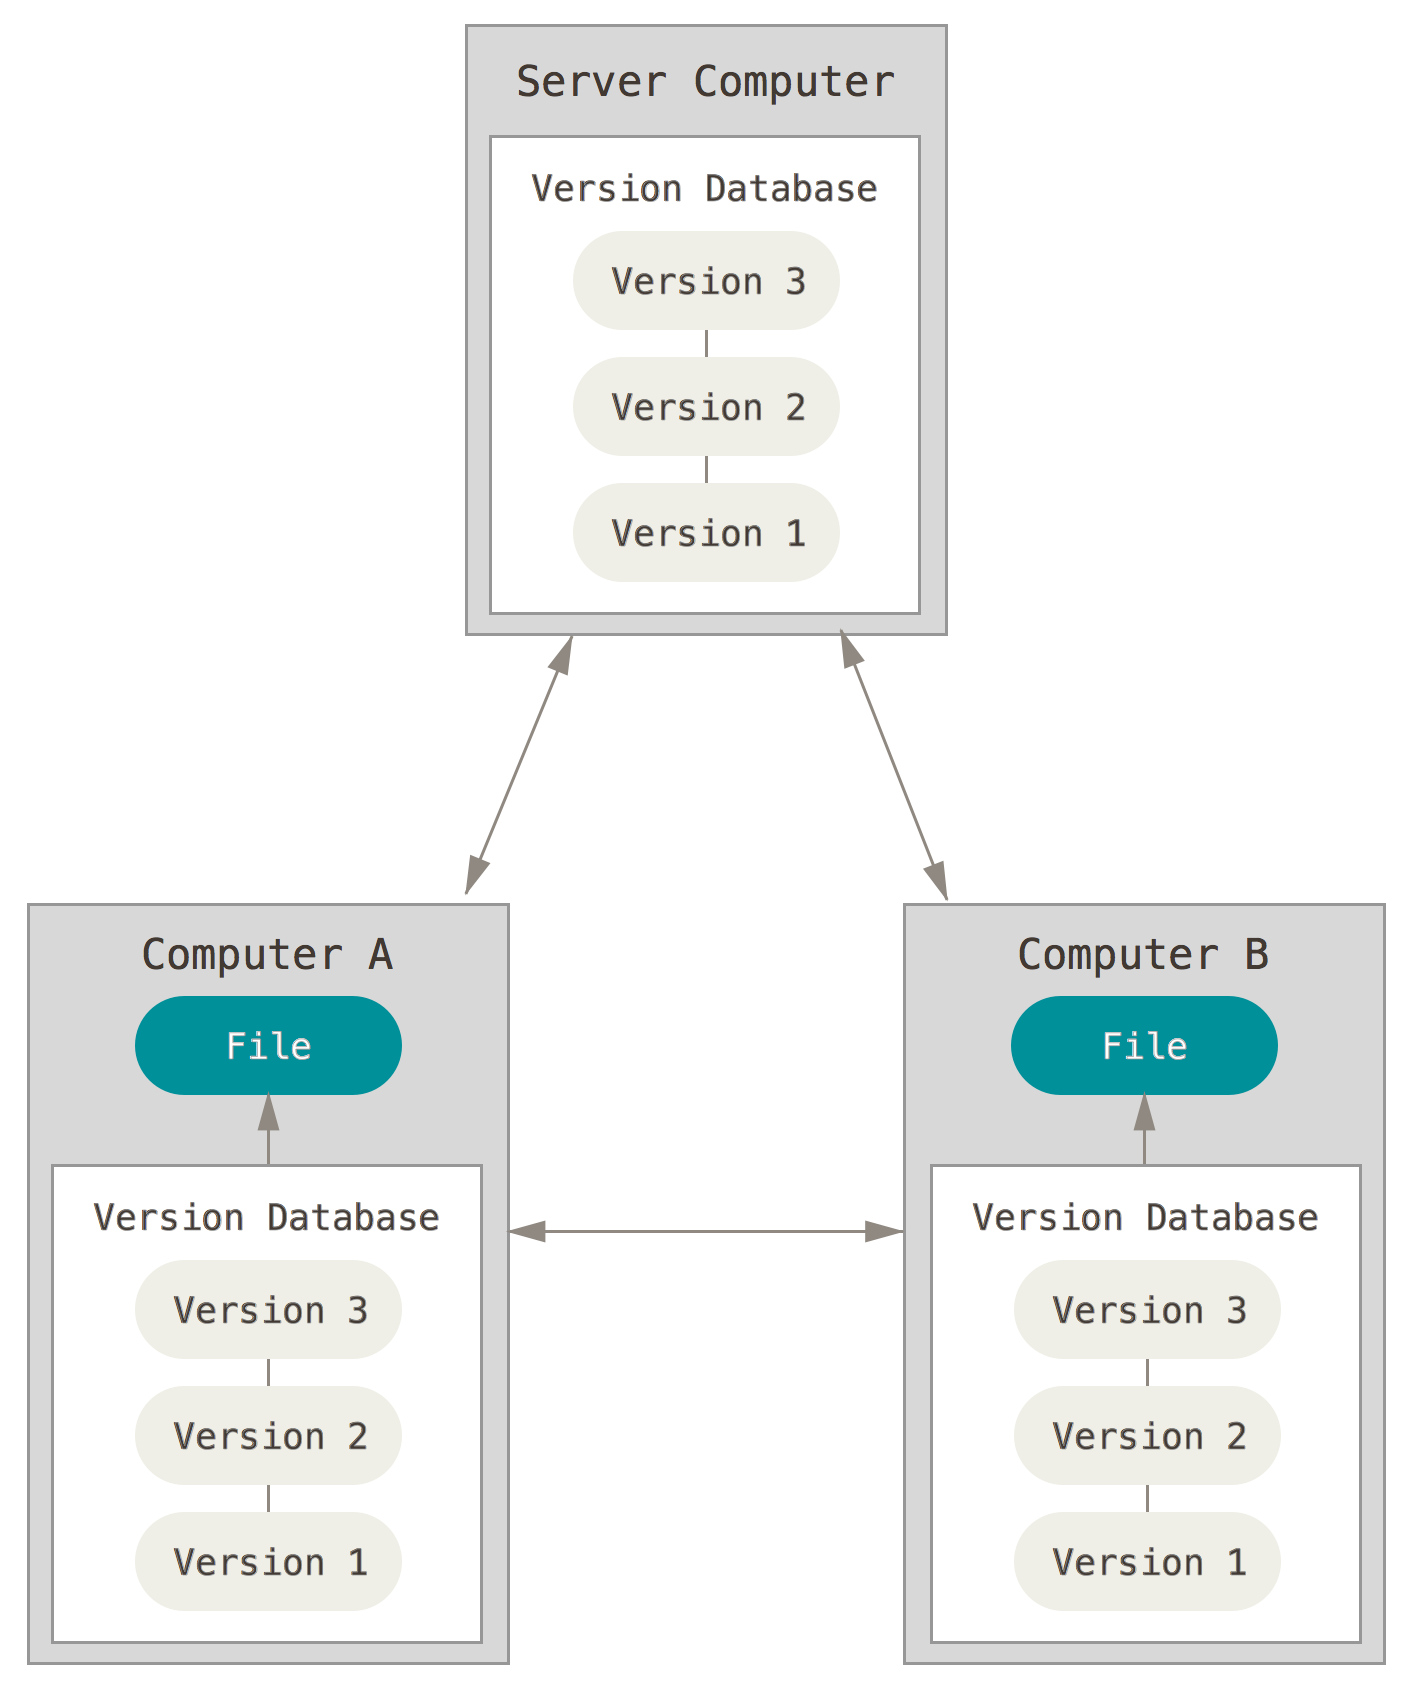
In order to resolve the caveats of the VCS above, several new VCS, known as distributed VCS, have been developed within the first decade of the new millennium. With these VCS, each client has a copy of the central database at their local storage device. Thus, every clone of the central repository with each client is a full backup of the project’s data and history. Consequently, if the central server/repository fails for any reason, the local repository of the team member that has the most recent clone of the project database can be used to restore the central repository. This VCS paradigm is currently the most popular class of VCS. We will be using a major implementation of it known as Git here. Other major DVCS implementations include Mercurial, Bazaar, and Darcs. The following figure illustrates the inner working of a DVCS.
A complete list of all major VCS software implementations can be found here.
Git/Mercurial version control system
Git is a DVCS that grew out of frustration between the Linux kernel developing community and a proprietary VCS software company that maintained and indexed Linux kernel development. Similar to another major DVCS implementation Mercurial, Git is designed with the following goals in mind:
- Speed.
- Simple design.
- Strong support for non-linear development (thousands of parallel branches).
- Fully distributed.
- Able to handle large projects like the Linux kernel efficiently (speed and data size).
Git/Mercurial project indexing method
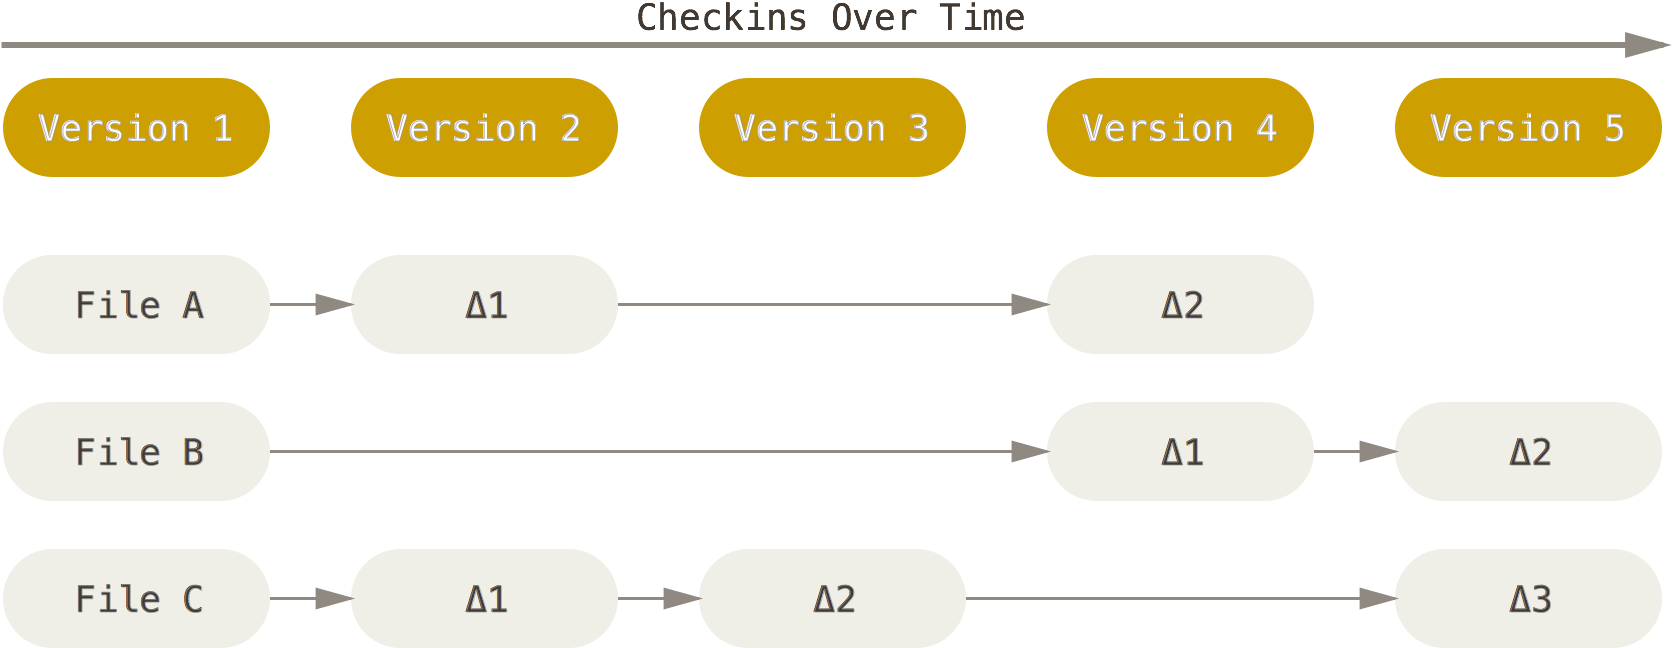
VCS software, such as SVN and Bazaar, indexes the new developments of a given project by tracking the changes in individual project files, similar to the diagram below.
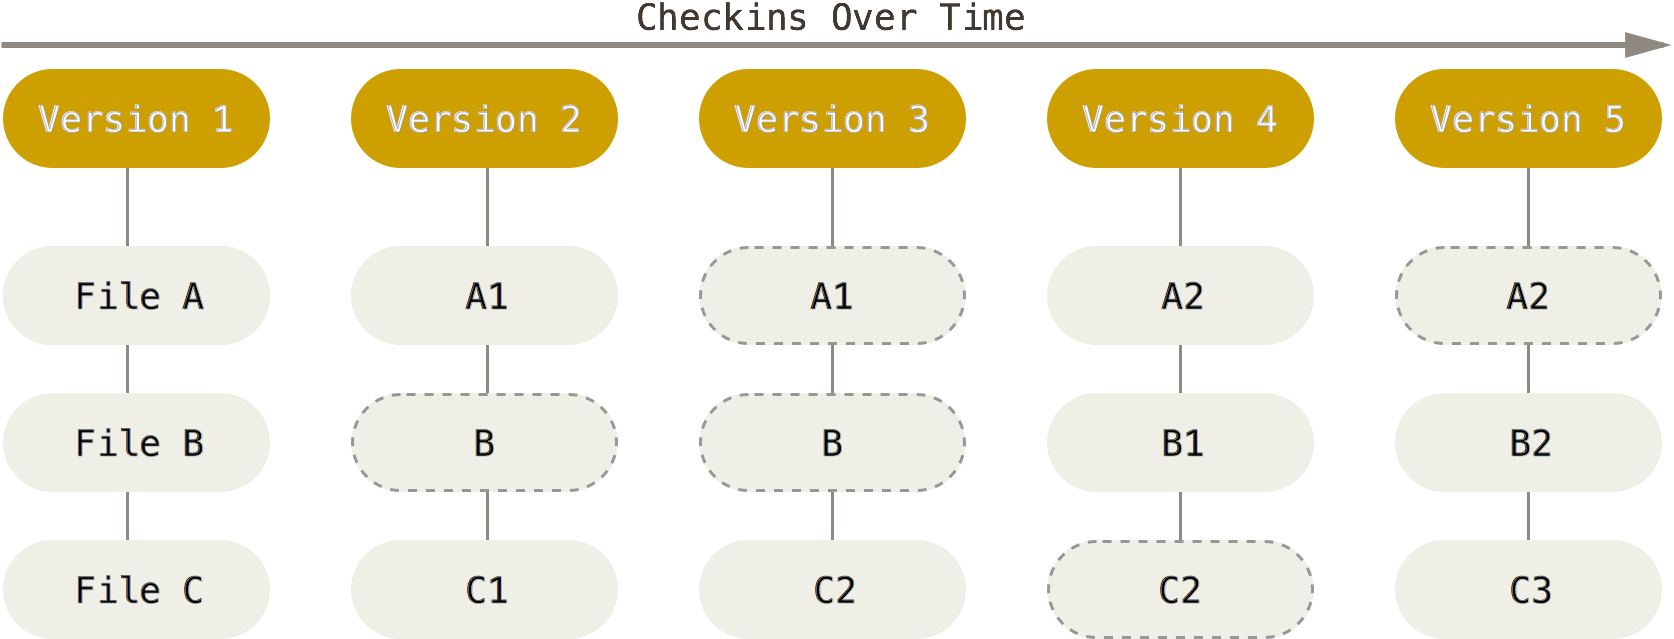
By contrast, both Git and Mercurial generate a complete snapshot of the project at any moment the project is committed to the local repository for version control. Even if some files have not changed in the new version of the project, they will still exist in the newly generated version. However, both Git and Mercurial have been designed smart enough to realize changes to individual files and then store the files effectively without redundancy. Git and Mercurial generate the project’s complete history by a series of snapshots, a flow similar to the following illustration.
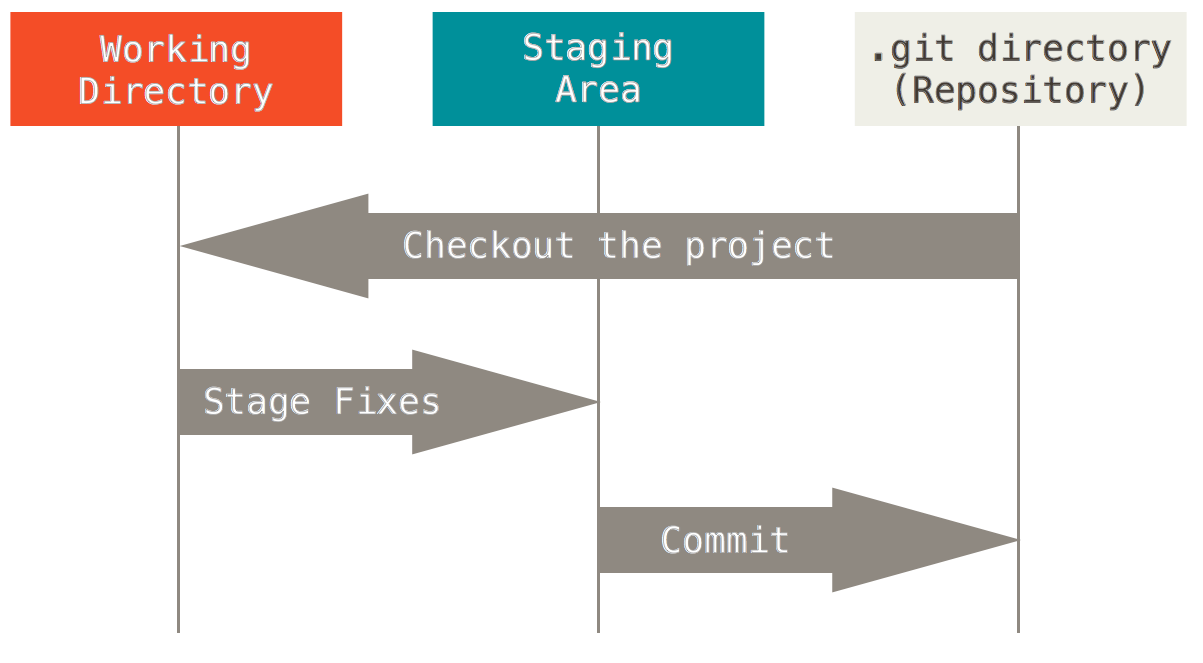
Each project’s file in Git/Mercurial indexing process can have one of the three possible states:
- modified, but not staged:
This is when the user modifies a project file, but Git/Mercurial has no track of the file changes. If the file is lost or removed unexpectedly, then Git cannot recover the file.
- staged for commit to the repository:
When the developer modifies a file, they can add it to the Git staging area to be later committed permanently to the repository. The staging area is a file, generally contained in the project’s repository (
.gitdirectory), that stores information about what will go into the next commit to the repository. The staging area is also sometimes referred to as the index. - committed to the repository: Once the staged files are committed to the repository, they become a permanent part of it. They can be later extracted (i.e., checked out) for review or further development.
These three file states comprise an essential integral part of Git and Mercurial. The following figure illustrates these three file states.
Remote repository options for your Git/Mercurial projects
Git can be downloaded and installed from here for Windows, Mac, or Linux systems. The installation guide is available here. Mercurial can be downloaded and installed from here for Windows, Mac, or other operating systems. For collaborative projects, you will need a central (remote) project repository to which all team members submit their latest developments. Even if you are working on a project alone, it is always a good idea to submit all of your project developments to a remote repository to avoid unpredicted data loss and publicly showcase your work. Three popular online repositories for version-controlled projects are:
- GitHub, which is also an Internet hosting service, works exclusively for projects that are indexed using Git VCS. Today, all public projects (visible to everyone on the web) on GitHub are free-of-charge. For private projects, you will have to pay a monthly fee. However, GitHub Student offers a micro-account especially for students with five private repositories free of charge (normally $7/month) while you’re a student.
- Bitbucket, which used to exclusively host Mercurial-indexed projects. But since 2011, it can also host Git-indexed projects. Currently, Bitbucket stores all public or private projects (up to 5 users) free of charge.
- GitLab, is another rather-new Git-repository manager that provides developer tools comparable wth GitHub and even more. At the moment, it is not as popular as GitHub. However, it is used by many major companies and industries worldwide for software version control (e.g., NASA, IBM, Boeing, CERN, Oracle, Sony, …).
GitHub and Bitbucket are particularly useful for education as they provide notable services and options for educational accounts and purposes. The following is a concise comparison between the general features and services of GitHub and Bitbucket.
| Feature | Bitbucket | GitHub |
| Supported VCS | Mercurial, Git | Git |
| Public repos | Free, unlimited | Free, unlimited |
| Private repos | Free up to 5 users | Starts at $7/month for unlimited users |
| Popular projects hosted | Adium, Mailchimp, Opera, Python, Django | Bootstrap, Node.js, jQuery, Rails, Homebrew |
| Notable Extra features | External authentication via GitHub, Twitter, Facebook, Google | Two-factor authentication, GitHub Pages, GitHub Gists |
Setting up your first Git project on GitHub
Here, we will use Git as our version control software, and GitHub as our central (remote) repository. Follow the guidelines below to create your first Git project on GitHub.
- Go to GitHub Student and create your student account.
- Download and install Git on your computer. Here is a set of instructions written to simply the installation and interaction process with Git for you.
Setting up your Git identity
The first thing you should do when you install Git is to set your username and email address. This is important because every Git commit uses this information, and this information is permanently baked into the commits that will make to your project’s repository. To set your name and email globally for all Git projects once and for all on your computer, use the following Git commands:
git config --global user.name "Amir Shahmoradi"
git config --global user.email shahmoradi@utexas.edu
You need to do this only once if you pass the --global option because then Git will always use the provided information for anything you do with Git on your system. Later on, if you want to override this information with a different name or email address for some specific projects, you can run the above same Git commands, but without the --global optional flag, only when you are in your specific project’s directory.
Two methods of project initialization
Now at this point, there are two ways for project initialization. We will go through both here. A good detailed tutorial can be found here.
Remote project initialization (on GitHub)
With this method you first initialize an empty project on GitHub, and then clone the project from the remote (GitHub) repository to your local device, using the git clone command, discussed later below. To create a remote repository on GitHub, login to your GitHub account and follow the instructions on this page.
Local project initialization
Local project initialization is done by the following git command:
git init
This command will initialize an empty repository in the current directory. If you check the directory containing your repository, you will notice that a new hidden .git folder has been added to the directory. This folder will contain all of the histories of your new project. Anything in the directory where the hidden .git folder exists will be indexed as part of the project.
In order to generate the project’s repository in a different directory, use
git init <directory name>
Even if the requested directory does not exist, git will first automatically create the requested directory and initialize an empty project inside of it. That’s it! Now all you need to do is add or develop your project files inside the project folder.
Local device and remote repository SSH connection
Why is SSH needed?
Now every time may you want to clone your remote private repository to your local device or push your local repository to a remote server (your GitHub account), or basically do any communication between the local and remote repositories, Git will ask you to authenticate your connection by supplying your GitHub username and password. Note that this security check is necessary since you want to make sure everyone is able to push unwanted changes to your projects or mess with them without your prior permission.
However, this rather annoying user/pass request by Git can be resolved by setting up an SSH secure connection between your local device and the remote repository.
SSH, also known as Secure Shell or Secure Socket Shell, is a network protocol that gives users a secure way to access a computer over an unsecured network. SSH may also refer to the suite of utilities that implement the SSH protocol.
How does it work?
Think of your local device as a person with a set of keys. Suppose your remote repository is a home with an entrance keyhole that matches one person’s keys. In that case, the person (i.e., your local device) can access the home’s interior (i.e., your remote repository).
How is it set up?
You can generate keys for your local device by following the instructions given here. Once you have generated the key and the keyhole, you can add a copy of the keyhole to your GitHub account by following the instructions given here.
Here is an example educational video explaining the SSH key setup process:
Main Git commands
As of today, Git has more than 150 commands. For a complete list, you can type the following on your Git bash command window,
git help -a
To see a list of all possible Git commands. Note that every Git command begins with git. Despite the long list of Git commands, you will likely use only five of them every day. While the rest of the commands are also important, with these five basic commands, you will be at least able to develop and index your project and communicate with your remote repository and colleagues. In order to understand these five, we will have to recall the three states of a project’s files, described earlier above.
git status: Check the status of the project
First, you can check the status of your git project at any time by typing the following command in the git-bash prompt window, assuming the command line is already in the project’s directory.
git status
git add: Add files to the staging area
In order to add any of the modified or new files to the staging area, use
git add <file name>
To add all modified files (including file removals as well as changes) to the staging area, use
git add -A
or,
git add --all
This command is equivalent to
git add .
git add -u
The first command stages the new and modified files but not the deleted files. The second command stages the modified and deleted files without the newly-created files.
The complete documentation for git add can be found here.
git commit: Commit the staged files to the local repository
The stages files can be committed (i.e., submitted permanently) to the local repository by
git commit
once this command is entered, a new page for log message will open on the command line, which contains the list of all files to be committed, and a place at the top of the page to add comments regarding this version of files that are being committed to the repository.
To add a comment, press i to enter the insert mode of the vim text editor. Once you add your comment to the text file, press ESC button to exit the insert mode, and write :wq on the command line to write the comment file (i.e., save it) and quit vim text-editor.
If you use,
git commit -a
or,
git commit --all
Both commands act as a shortcut to first automatically stage files that have been modified and deleted and then commit them to the repository, but not the new files that you have not yet told Git about. Another helpful flag is -m, with which you can enter a short message on the command line as the log message of the commit, and therefore no new page will open up for entering the log message,
git commit -m "This is a test commit!"
The -a and -m flags can be combined to automatically stage and commit the files together,
git commit -am "This is a test commit!"
But keep in mind that with this staging method, the new files will neither be staged nor committed to the repository.
The complete documentation for git commit can be found here.
Using Notepad++ and Sublime along with Git to commit changes to Git repositories
In recent years, Notepad++ has become a popular general-purpose text editor on Windows operating systems. As a result, Git has recently provided users with the optional feature that enables Git commits messages to be crafted via Notepad++ software instead of the lower-level command-line text-editing environment vim. To set Notepad++ as your default text editor for Git, you will need to first download and install Notepad++. Then on the Git Bash command-line type the following commands to set the default text editor of Git to Notepad++,
git config --global core.editor "C:\Program Files (x86)\Notepad++\notepad++.exe"
Note that you must modify the address provided above to point to the location where notepad++.exe exists on your device. Notepad++ is only available on Windows systems. If you prefer to use text editors other than vim on other operating-system platforms, you can follow the same command above but change the address to point to the path of the text editor of your choice on your device. For example, if you are using Mac device and you’d like to use Sublime text editor, you can install Sublime first and then type the following command on the Git Bash command line,
git config --global core.editor "/Applications/'Sublime Text.app'/Contents/SharedSupport/bin/subl -n -w"
Again, you will have to change the example address provided in the command above, in the double-quotation marks, to the path pointing to the location where Sublime is installed on your device.
git push: Push the changes in the local repository to the remote repository
Now, to push all your commits from the local repository to the remote repository, to place them permanently there and be able to share them with others, use
git push --all
We have not yet talked about git branches, but what the above command does is that it orders Git to push all branches of the project to the remote repository. Later, we will talk more about flags that can follow git push command.
The complete documentation for git push can be found here.
git pull: Pull the latest project revision from the remote to the local repository
Sometimes, your project collaborators might be working simultaneously but independently on the project. In such cases, whenever you want to restart your work on your project, you should first pull the latest revision of the project – that is not available yet in your local repository – from the remote to your local repository. To do so, you can use
git pull
There are some essential details about git pull, which we will delve into later in the following sections.
The full documentation for git pull can be found here.
Summary of main Git commands
All in all, the most trivial, but also the most helpful git commands are the following:
git status
git add --all
git commit
git push --all
for submitting your changes to the local and remote repositories, and
git pull
for syncing your local with the remote repository. Remember that you have to use these commands in the above forms, inside the directory of the project.
Getting help with Git commands
There are three ways to request information about Git commands on the Git-bash command line:
git help <command name>
git <command name> --help
man git-<command name>
Note that the last command, man is not a Git command, but a Bash environment command. Just as a reminder, all Git commands begin with the word git.
Viewing the Git commit history
You can check the history of your project’s commits to the repository using the Git command git log.
For example, here is a snippet from the output of git log on my laptop screen:
git log
commit 264043e0d49006b7f59e57639961c333b5d5f124
Author: Amir Shahmoradi <a.shahmoradi@gmail.com>
Date:   Tue Jan 24 17:48:33 2017 -0600

    data tables for 1D model added.

commit b45ddd780c18736bac42ff27aade301a6b0f09cb
Author: Amir Shahmoradi <a.shahmoradi@gmail.com>
Date:   Tue Jan 24 10:08:53 2017 -0600

    minor edit

commit b6f4fb69d97a396bde7159c78424100704328634
Author: Amir Shahmoradi <a.shahmoradi@gmail.com>
Date:   Thu Jan 12 21:03:28 2017 -0600

    *.txt files removed

commit 961ff2d4ac68081a21864b2f1b067b43424d3342
Author: Amir Shahmoradi <a.shahmoradi@gmail.com>
Date:   Thu Jan 12 21:02:00 2017 -0600

    update

commit 8fd3c49e90d96f4bcef2302c7b227f06ad7a5250
Author: Amir Shahmoradi <a.shahmoradi@gmail.com>
Date:   Thu Jan 12 19:36:45 2017 -0600

    minor

commit cd0ed7def385ba29ea134bcc18a4ad0873d9f5ee
Author: Amir Shahmoradi <a.shahmoradi@gmail.com>
Date:   Thu Jan 12 19:32:51 2017 -0600

    minor

commit 8096668868ef64189f788669d5f1838cd944f9b6
Author: Amir Shahmoradi <a.shahmoradi@gmail.com>
Date:   Thu Jan 12 19:28:22 2017 -0600

    minor

commit c52ba6adea474625cce1493896ecaac40cb976af
Author: Amir Shahmoradi <a.shahmoradi@gmail.com>
Date:   Thu Jan 12 19:24:23 2017 -0600

    minor

commit ab5a17f9e913e55cae0f971fd9b485a0a6e8dec3
Author: Amir Shahmoradi <a.shahmoradi@gmail.com>
Date:   Thu Jan 12 19:16:27 2017 -0600

    minor

commit ce5c2421db6e76a338a0e6922acead9100a7c4c4
Author: Amir Shahmoradi <a.shahmoradi@gmail.com>
Date:   Thu Jan 12 19:10:19 2017 -0600

    minor

commit 4a7d27d81260c2e2a29b6259e6c97befc065c069
Author: Amir Shahmoradi <a.shahmoradi@gmail.com>
Date:   Thu Jan 12 19:05:14 2017 -0600

:
A long list of options can be used with the git log command to display exactly what you need on the Bash environment screen.
Some of the most useful options are discussed below.
To lists the differences between different commits of the same file, use -p flag:
git log -p
To list only a limited count of the most recent commits, use -<number of commits to display> flag. For example:
git log -2
commit 264043e0d49006b7f59e57639961c333b5d5f124
Author: Amir Shahmoradi <a.shahmoradi@gmail.com>
Date:   Tue Jan 24 17:48:33 2017 -0600

    data tables for 1D model added.

commit b45ddd780c18736bac42ff27aade301a6b0f09cb
Author: Amir Shahmoradi <a.shahmoradi@gmail.com>
Date:   Tue Jan 24 10:08:53 2017 -0600

    minor edit
To list the statistics of the commits, use,
git log --stat -1
commit 264043e0d49006b7f59e57639961c333b5d5f124
Author: Amir Shahmoradi <a.shahmoradi@gmail.com>
Date:   Tue Jan 24 17:48:33 2017 -0600

    data tables for 1D model added.

 README.md                |   1 +
 results/tables/README.md |   8 ++-
 results/tables/tgm.mat   | Bin 0 -> 2550889 bytes
 src/defineProject.m      |   3 +-
 src/main.m               |  82 +++++++++------------------
 src/writeTables.m        |  75 ++++++++++++++++++++++++
 9 files changed, 140 insertions(+), 56 deletions(-)
The log data can be even represented in formatted style via the flag --pretty=format: "<the desired format>``. For example,
git log -3 --pretty=format:"%h - %an, %ar : %s"
264043e - Amir Shahmoradi, 7 days ago : data tables for 1D model added.
b45ddd7 - Amir Shahmoradi, 7 days ago : minor edit
b6f4fb6 - Amir Shahmoradi, 3 weeks ago : *.txt files removed
A list of available format options is provided below:
| Option | Description of Output |
|---|---|
%H |
Commit hash |
%h |
Abbreviated commit hash |
%T |
Tree hash |
%t |
Abbreviated tree hash |
%P |
Parent hashes |
%p |
Abbreviated parent hashes |
%an |
Author name |
%ae |
Author email |
%ad |
Author date (format respects the --date=option) |
%ar |
Author date, relative |
%cn |
Committer name |
%ce |
Committer email |
%cd |
Committer date |
%cr |
Committer date, relative |
%s |
Subject |
A list of useful options for git log is given in the table below.
| Option | Description |
|---|---|
-p |
Show the patch introduced with each commit. |
--stat |
Show statistics for files modified in each commit. |
--shortstat |
Display only the changed/insertions/deletions line from the --stat command. |
--name-only |
Show the list of files modified after the commit information. |
--name-status |
Show the list of files affected with added/modified/deleted information as well. |
--abbrev-commit |
Show only the first few characters of the SHA-1 checksum instead of all 40. |
--relative-date |
Display the date in a relative format (for example, "2 weeks ago") instead of using the full date format. |
--graph |
Display an ASCII graph of the branch and merge history beside the log output. |
--pretty |
Show commits in an alternate format. Options include oneline, short, full, fuller, and format (where you specify your own format). |
A list of useful options for git log commands that can change the output format is given in the table below.
| Option | Description |
|---|---|
-<n> |
Show only the last n commits (e.g., -2, -3, ...). |
--since, --after |
Limit the commits to those made after the specified date. |
--until, --before |
Limit the commits to those made before the specified date. |
--author |
Only show commits in which the author entry matches the specified string. |
--committer |
Only show commits in which the committer entry matches the specified string. |
--grep |
Only show commits with a commit message containing the string. |
-S |
Only show commits adding or removing code matching the string. |
For example, to list the commit history since a specific time in the past, use --since flag:
git log --since=2.weeks
commit 264043e0d49006b7f59e57639961c333b5d5f124
Author: Amir Shahmoradi <a.shahmoradi@gmail.com>
Date:   Tue Jan 24 17:48:33 2017 -0600

    data tables for 1D model added.

commit b45ddd780c18736bac42ff27aade301a6b0f09cb
Author: Amir Shahmoradi <a.shahmoradi@gmail.com>
Date:   Tue Jan 24 10:08:53 2017 -0600

    minor edit
or, with the following date format:
git log --since="2017-01-15"
Undoing, amending, and tagging
Suppose you want to undo the latest addition of files to the staging area of your Git repository. The command that you need to use to clean the stage area is,
git reset
This command is the opposite of git add. There are a lot of options that can accompany this Git command, details of which can be found in Git documentation.
However, be careful when using this command, especially with flag --hard, which can also result in changes in your working directory, thus leading to involuntary loss of latest uncommitted files.
Another useful command is,
git commit --amend
which is used when you forget to add some files to your latest commit, and now, you would like to add the latest content of your project’s staging area to the last commit by amending it.
The Git command git tag allows you to tag specific important commits in your project’s commit history, for example, a final release of your project (e.g., software). If you just type git tag on Git bash command line, it will list all tags in the project, in alphabetical order,
git tag
v1.0
v1.1
v2.0
You can create a tag for the latest commit to your repository by using,
git tag -a v3.0 -m "new version of the project"
This will add a new tag pointing to the latest commit in the project with the name v3.0 and the message new version of the project.
Now if you want to display the information about a specific tag, use git show,
git show v1.0
tag v1.0
Tagger: Amir Shahmoradi <a.shahmoradi@gmail.com>
Date:   Tue Jan 1 18:08:00 2017 -0600

first tag

commit 25129a074aece69d234838764e7df63ed1fb3023
Author: Amir Shahmoradi <a.shahmoradi@gmail.com>
Date:   Fri Dec 27 17:12:08 2016 -0600

    Update README.md
You can also create a lightweight tag by avoiding -a, -s, or -m flags in your tag command,
git tag v4.0
Annotated tags (created with -a flag) are meant for significant project versions, such as a software release, while lightweight tags are meant for private or temporary object labels.
For more information about git tag, see Git documentation.
Working with remote Repositories
In order to see which remote servers you have configured for your project, you can run the following Git command,
git remote
origin
In the output above, origin is the default name that Git gives to the server from which you cloned your project. If you also specify -v flag, Git will show you the URLs that Git has stored corresponding to the remote’s short name (e.g., origin). This URL is used to read from or write to the remote repository.
git remote -v
origin  git@github.com:shahmoradi/foo.git (fetch)
origin  git@github.com:shahmoradi/foo.git (push)
To see more information about the remote repository of your project, you can use,
git remote show origin
* remote origin
  Fetch URL: git@github.com:shahmoradi/foo.git
  Push  URL: git@github.com:shahmoradi/foo.git
  HEAD branch: main
  Remote branches:
    development tracked
    main        tracked
  Local branch configured for 'git pull':
    main merges with remote main
  Local ref configured for 'git push':
    main pushes to main (up to date)
The above information indicates that the current HEAD branch of the project is on main branch, and the remote branches on the remote repository are main and development.
You can find more information about git remote command in Git documentation.
Git branching
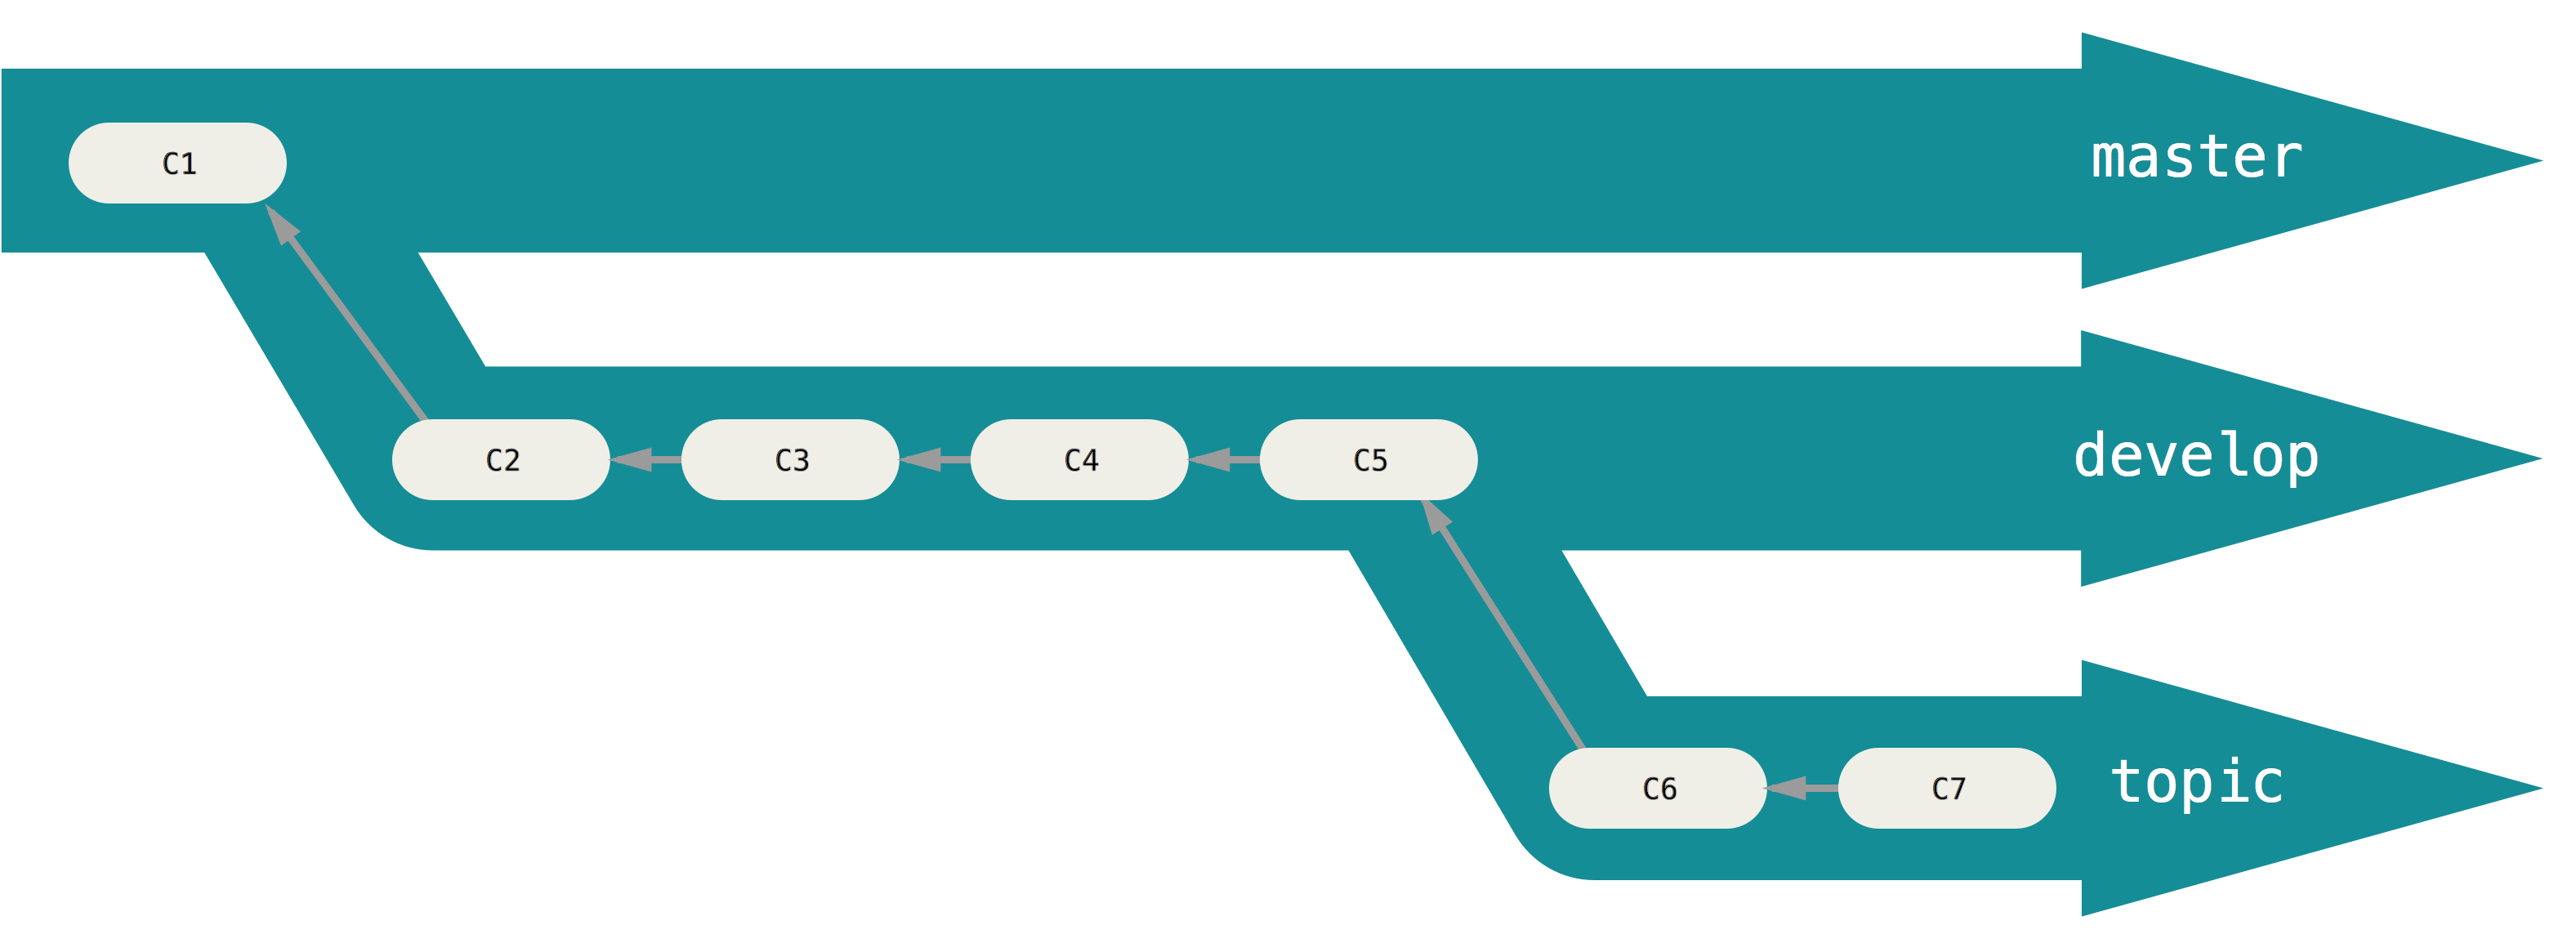
Branching is a powerful idea in the Version Control System, which significantly facilitates collaboration or parallel development of a project. Suppose you already have a project that has reached its first release version, meaning that it works fine. Now, you like to add a new feature to your project. To do this and avoid further committing to your original project, you can create a new branch of the project devoted explicitly to adding the new feature. See the following figure for an example of Git branching.
When you create a Git project, the single default branch in your project is main. So, for example, if you search for your project branches, you’d see,
git branch
* main
If you have already created other branches in your project, for example, development, then you may see a Git message like the following,
git branch
* development
  main
The * behind the branch name indicates that the project HEAD (i.e., your working directory) points to that branch. This means all commits will be made to that branch highlighted by *. The working directory points to the development branch in the example above.
Creating a new branch
To create a new branch in your project, use,
git branch <branch name>
For example,
git branch development
When you create a new branch, Git creates an exact duplicate of the current branch that you are in, but with the requested name for the new branch.
Checking out a branch
In order to switch to a specific Git branch in your project, use,
git checkout <branch name>
For example,
git checkout development
Switched to branch 'development'
A shortcut for both creating a new branch from the current branch and switching to the new branch automatically is to use,
git checkout -b <branch name>
git checkout -b test
Switched to a new branch 'test'
Suppose you have made significant progress on your project development branch, and now you want to add the newly-developed feature in the development branch to your main branch. All you need to do is,
git checkout main
git merge development
By doing this, you first switch to the main branch, then request Git to merge all changes made to the project on the development branch to be copied and transferred to the main branch. For example, if I have added a single test.txt file, and committed the change to the development branch, then upon merging it with the main branch, Git will display a message like the following,
git merge development
Updating 25129a0..57ed7c2
Fast-forward
 test.txt | 2 ++
 1 file changed, 2 insertions(+)
 create mode 100644 test.txt
Suppose there has been no change in the development branch since branching it from the main branch. Then upon merging, you would get a message like the following,
git merge development
Already up-to-date.
Occasionally, conflicts may arise between branches upon merging. This happens when a common file between the two branches, has been modified on both branches in parallel. In such cases, you will need to resolve the conflict by choosing one file edit in one branch and discarding the other. The following is an example merge conflict message by Git.
git merge development
Auto-merging test.txt
CONFLICT (content): Merge conflict in test.txt
Automatic merge failed; fix conflicts and then commit the result.
For example, if you use git status command, the following is the typical message that will be displayed,
git status
On branch test
You have unmerged paths.
  (fix conflicts and run "git commit")
  (use "git merge --abort" to abort the merge)

Unmerged paths:
  (use "git add <file>..." to mark resolution)

        both modified:   test.txt

no changes added to commit (use "git add" and/or "git commit -a")
To resolve the conflict, open the conflicting file. There you will see segments of the file from both versions, which cause the conflict. Edit the file as you wish. Then, perform the normal git add and git commit on the file to resolve the conflict and complete the merge process.
In addition to git merge, there is another more elegant and powerful Git command, git rebase for integrating changes in different branches into a single branch. But, the subject goes beyond the goals of this class, and the interested reader is referred to Git documentation for this command and this pedagogical Git page for git rebase.
Deleting a branch
Normally, when a branch merge is done, the development branch is no longer needed, so it is always wise and cleaner to delete the unwanted branches using the command git branch -d <branch name>. To do this, check out the same branch on which you just performed git merge, then delete the other unwanted branch,
git checkout main
Your branch is ahead of 'origin/main' by 1 commit.
  (use "git push" to publish your local commits)
Switched to branch 'main'
git branch -d test
Deleted branch hotfix (3a0874c).
Note that you cannot delete a branch while you are on it (i.e., while it is checked out). If you do so, Git will print out an error message like the following on-screen,
git branch -d test
error: Cannot delete branch 'test' checked out at 'C:/Users/Amir/git/foo'
You cannot delete a branch from another branch with which you have not performed the merging either. In this case, Git will print the following error,
git branch -d test
error: The branch 'test' is not fully merged.
If you are sure you want to delete it, run 'git branch -D test'.
Your main branch should always contain the latest clean version of your project, that is, the complete and working version/release. You should always make your new developments in a separate branch, and once it works and the new feature/development is complete, you merge the new development into the main branch.
Footnotes
1. For a thorough review of VCS and particularly Git, see the Git documentation. ↩
2. See Git documentation for more details and updates. ↩